Product Support & Troubleshooting
Product Support & Troubleshooting
Information regarding shipping and delivery, exchanging a product and initiating a return.
We have several free resources you can use any time to enhance your home exercise program!
3 WAYS TO CONTINUE YOUR THERAPY AT HOME
WATCH OUR FREE RECOVERY EXERCISE VIDEOS
Subscribe to our YouTube channel to receive updates on NEW exercise videos!
The following are suggestions for cleaning Saebo products. Please refer to your infection control policy or coordinator for your required cleaning procedure.
Care & Cleaning Guidelines for the SaeboFlex and SaeboReach
Cleaning: We recommend using Clorox® 4 in One Disinfectant and Sanitizer*. To clean properly: (1) don personal safety equipment; (2) remove liners from the plastic shell; (3) hold the can 6-8 inches away from the device; (4) spray all surfaces until visibly wet, DO NOT soak; (5) let the device dry for 5 minutes; (6) disassemble the components; (7) store the device and its components. You may also use a typical hospital/clinic rehabilitation cleaning solution**. To clean properly, spray or apply the solution to a clean cloth and wipe down all parts of the device before storing it.
Note: SaeboFlex and SaeboReach foam liners are closed-celled and are reusable after wiping. If the foam liner looks to be breaking down, usually along the edges, it is no longer closed-cell and needs to be removed (pre-fabricated shells only). Replace this liner with a new liner. Always wash and dry the client’s affected hand before every use.
When to replace: Replace and discard the old components when one of the following occurs: (a) when the foam liners do not have smooth surfaces; the closed-cell design is no longer safe for the recommended cleaning (pre-fabricated shells only); (b) when the straps for the digit caps begin to fray; the straps are no longer safe for the recommended cleaning; (c) if the plastic plate or shell cracks, they are no longer safe for usage (rare). Replace these components to ensure quality infection control.
Care & Cleaning Guidelines for the SaeboStretch
Cleaning: We recommend using Clorox® 4 in One Disinfectant and Sanitizer*. To clean properly: (1) don personal safety equipment; (2) unzip and remove the splint cover; (3) hold the can 6-8 inches away from the device; (4) spray all fabric and metal surfaces until visibly wet, DO NOT soak; (5) let the device dry for 5 minutes; (6) reassemble and store the device.
Note: To maintain your SaeboStretch cover in good working condition, thoroughly wash and dry the client’s affected hand before every use. Use soap and lukewarm water to wash the material when soiled.
When to replace: Order and replace the SaeboStretch components when the following occurs: (a) adequate amounts of pilling (small fabric balls) become present; (b) the fabric is torn; (c) the 3MTM Hook and Loop Fastener does not hold firmly; (d) the zipper does not fully zip; (e) stitching is unraveling; (f) visible discoloration is permanent, or (g) if the internal metal splint breaks.
Care & Cleaning Guidelines for the SaeboGlove
Cleaning: We recommend using Clorox® 4 in One Disinfectant and Sanitizer*. To clean properly: (1) don personal safety equipment; (2) separate the glove from the splint; (3) hold the can 6-8 inches away from the device; (4) spray all surfaces of the glove and splint until visibly wet, DO NOT soak; (5) let the device dry for 5 minutes; (6) remove and store all tensioners; (7) store the device.
Note: To maintain your SaeboGlove liner in good working condition, thoroughly wash and dry the client’s affected hand before every use. Use soap and lukewarm water to wash the material when soiled.
When to replace: Order and replace the SaeboGlove components when the following occurs: (a) adequate amounts of pilling (small fabric balls) become present; (b) the fabric is torn; (c) the 3MTM Hook and Loop Fastener does not hold firmly; (d) stitching is unraveling; (e) visible discoloration is permanent, or (f) the wrist splint cracks or brakes
Care & Cleaning Guidelines for the SaeboStim Micro
Cleaning: We recommend using Clorox® 4 in One Disinfectant and Sanitizer*. To clean properly: (1) don personal safety equipment; (2) disconnect the lead wires from the glove and the elbow sleeve; (3) separate the electrical stimulation unit from the wrist strap and place aside; (4) hold the can 6-8 inches away from the glove, sleeve, and strap; (5) spray all surfaces of the components until visibly wet, DO NOT soak; (6) let them dry for 5 minutes; (7) spray or apply the solution to a clean cloth; (8) wipe down all parts of the electrical stimulation unit and lead wires; (9) let them dry for 5 minutes; (10) store the device.
Note: Avoid spilling liquids on the SaeboStim Micro. Avoid caustic cleansers. Use soap and lukewarm water to wash the glove and elbow sleeve when soiled.
When to replace: Order and replace the SaeboStim Micro components when the following occurs: (a) adequate amounts of pilling (small fabric balls) become present; (b) the fabric is torn; (c) stitching is unraveling; (d) visible discoloration is permanent, (e) the hook and loop fasteners do not hold firmly; (f) the sheathing of the lead wires cracks or breaks; (g) the screen of the electrical stimulation unit becomes opaque; or (h) the electrical stimulation unit is not functioning properly.
Care & Cleaning Guidelines for the SaeboStim One
The white controller unit, wings, and polybag should be cleaned regularly. Do not allow the interior of the controller unit to become wet during cleaning. The controller unit is fitted with a fluid detection device.
Cleaning: We recommend using Clorox® 4 in One Disinfectant and Sanitizer*. To clean properly: (1) don personal safety equipment; (2) disconnect the wings and remove/cover the gel pads if needed (see Note below); (3) spray the cloth until damp, DO NOT soak cloth; (4) wipe down all parts of the controller unit, the BLUE side of the wings; and the polybag; (5) let them dry for 5 minutes; (6) turn the polybag inside out and allow to fully dry; (7) insert the wings into the polybag; (8) store the device.
Note: DO NOT attempt to take apart the wings. The gel pads of the SaeboStim One are designed to be used on one person only and not meant to be removed and stored for later application. Once the gel pads are placed onto the wings, they must stay there until ready for discard. Removal of the gel pad results in disruption of the integrity and function of the pad. Attempts to do this will result in an increased risk of client injury. Cover the gel pads with the original film and place the wings into the included polybag for later use on the same client. When removing the gel pads from the SaeboStim One, roll the pad from the proximal edge to the distal edge of the wing for easiest removal.
When to replace: Order and replace the SaeboStim One components when the following occurs: (a) the plastic shell on the electrical stimulation unit is broken; (b) the electrical stimulation unit is not functioning properly; (c) the gel pads are not sticking to the skin; (d) the wings are visibly torn or damaged; (e) the silver side of the wings is scratched
Care & Cleaning Guidelines for the SaeboStep
Cleaning: We recommend using Clorox® 4 in One Disinfectant and Sanitizer*. To clean properly: (1) don personal safety equipment; (2) place the device in an upright position separating the hook and loop straps so they do not touch; (3) pull out the BOA dial; (4) pull the lace/Spectra cord completely out and lay it out in front of the device; (5) hold the can approximately 6-8 inches away from the device; (6) spray or apply the solution to all surfaces until slightly damp; DO NOT soak; (7) let the device dry for 5 minutes; (8) store the device.
When to replace: Order and replace the SaeboStep components when the following occurs: (a) adequate amounts of pilling (small fabric balls) become present; (b) the fabric is torn; (c) the 3MTM Hook and Loop Fastener does not hold firmly; (d) stitching is unraveling; (e) visible discoloration is permanent; (f) the plastic clip does not latch; (g) the BOA dial does not work; (h) the lace or spectra cord is torn; (i) the hooks or anchors are nonfunctional.
Care & Cleaning Guidelines for the Saebo Mirror Box
Cleaning: We recommend using Clorox® 4 in One Disinfectant and Sanitizer*. To clean properly: (1) don personal safety equipment; (2) stand up the device; (3) spray or apply the solution to all surfaces until slightly damp; (4) let them dry for 5 minutes; (5) wipe the mirror of any visual residue; (6) fold the mirror box and store the device.
Care & Cleaning Guidelines for Saebo Clinical Equipment
This section includes the SaeboMAS, SaeboReJoyce, SaeboVR, and Saebo MyoTrac Infiniti.
Cleaning: We recommend using Clorox® 4 in One Disinfectant and Sanitizer*. To clean properly: (1) don personal safety equipment; (2) shut off all electronics; (3) hold the can 6-8 inches away from a cloth; (4) spray the cloth until damp, DO NOT soak cloth; (5) wipe down the device on all surfaces; (6) let the device dry for 5 min; (7) safely store the device in its proper resting position.
Additional Notes
*Specific product directions can be found on the Clorox® product label and website.
**Use of hospital grade cleaning products on devices besides the SaeboFlex and the SaeboReach may result in disruption of the integrity and function of the devices.
SaeboStim One
Having trouble with your SaeboStim One? Use this Troubleshooting Guide to get your device up and running again!
Here are the steps to troubleshoot your SaeboStim One if, when you press the power button, the unit does not power on and/or the light does not illuminate.
Step 1: Press and hold the power button for 5 seconds. If the light does not come on, proceed to Step 2.
Step 2: Inspect the USB charging cord for tears, fraying, or splits. If your USB charging cord is damaged, you may need to request a new cord. Open a Support Ticket to do so. If your USB charging cord is intact, please proceed to Step 3.
Step 3: Ensure the unit has been charged for at least 2.5 hours since the last time you tried to power on the device.
To fully troubleshoot per the manufacturer’s recommendation, try charging the device for 5 hours.
Step 4: Connect the control unit to the power cord head. If the light is blinking, charge the unit for up to 5 hours, or until the light is no longer flashing.
Step 5: Inspect the connection between the power cord head and the control unit to see if you notice any gaps. If the unit pops off too easily from the power cord head, or there seems to be an issue with the connection, proceed to Step 6.
Step 6: Let’s walk through correctly connecting the power cord to the control unit.
a. Place the control unit on a table with the button side facing down.
b. Locate the two small holes at the bottom of the control unit.
c. Hold the power cord head next to the control unit, with the magnet side up, so that the two metal prongs are oriented at the same end as the two small holes on the control unit.

d. Slowly flip the head of the power cord over so that it connects to the control unit and the magnets engage so you can pick the control unit up off the table.

Step 7: Once you have established a secure connection between the power cord head and the control unit, charge the unit for up to 5 hours. If your device still will not power on, please call Open a Support Ticket for further assistance.
The light on the Control Unit is blinking.
If the light on your SaeboStim One Control Unit is blinking, it means that the battery is low. The unit needs to recharge. Please follow the steps above to ensure a good connection and recharge your unit for at least 2.5 hours.
The Control Unit is beeping and won’t produce stimulation.
Beeping from the Control Unit is a safety indicator; it means there is a bad connection.
- Check to see if the control unit is working properly by applying to your skin or placing it on another set of wings, if available.
- Ensure the Gel Pads are placed on the Wings correctly.
- Do you feel stimulation when pressing the Wings and gel pads closer to your skin?
- If not, please replace the gel pads and try again.
The Control Unit powers ON, the light illuminates, but no stimulation is felt.
If you are not feeling stimulation while the Control Unit is powered on and attached to your skin, please follow the following troubleshooting tips.
Step 1: Please ensure the clear plastic film has been completely removed from the Gel Pads.
Step 2: Make sure the Gel Pads are properly attached to your skin. The area should be clean and free of lotion, cream, sweat, thick hair, or dead skin before applying the Gel pads. The Gel Pads should be moist and sticky.
Tip: Try cleaning your skin with mild soap and water or rubbing alcohol and let the area dry completely before applying the Gel Pads.
Step 3: Ensure the Wings are properly attached to the Control Unit. The Wings are magnetic, and you should hear a “snapping” noise when attaching the Wings to the control unit.
Tip: Try pressing the Wings against your skin while the unit is running.
Step 4: Make sure you are not turning the intensity down instead of up!
- When looking at the unit, the “Saebo” logo should be right-side up.
- There are two raised dots on the Intensity Control Button above the Saebo logo, which increase the intensity of the unit. The single raised dot below the Saebo logo lowers the intensity.
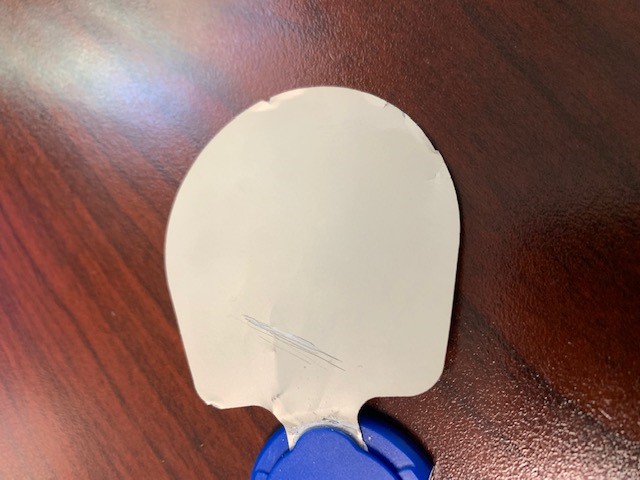
Step 5: Inspect the Wings for any signs of damage or wear and tear.
- Blue paint rubbing or scratched off the top of the Wings (shown below) is okay.
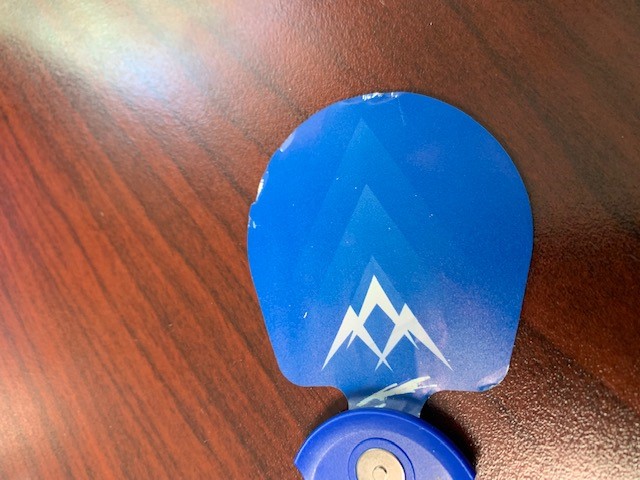
- Silver paint coming off the bottom of the Wings, or torn edges of the Wing (shown below) may interrupt electrical stimulation across the Wing.
If you notice damage to the Wings, you may need to order Replacement Wings from our Online Shop.
NOTE: This product has a 90-day warranty for the Wings and a 1-year warranty for the control unit. For international sales, there is a 2-year warranty for the control unit.
The Gel Pads are not sticking to the skin.
If you are having trouble getting your Gel Pads to adhere properly to your skin, ensure you have followed the guidelines below. If you would like to order new Gel Pads, please visit our Online Shop!
- Ensure the Gel Pads are firmly attached to the Wings.
- Do not apply any lotion, body oil, oil-based soap, or any type of soap that has oil in it on your hands or skin. If you have recently washed your hands or skin with an oil-based cleanser, this can affect the conductivity of the Gel Pads.
- Sometimes long/coarse body hair will prohibit the gel pad from properly sticking to the skin. If this seems to be the issue, it is recommended to remove the hair prior to applying the Gel Pads.
- Dry, flakey skin has a tendency to stick to the Gel Pads and other electrodes causing them to quickly lose their stickiness. Try cleaning and exfoliating the area and allowing it to dry completely before applying the Gel Pads.
- When storing your Gel Pads, be sure to replace the thin plastic sheets on the Gel Pads and place the Wings into the polybag immediately after using them. Do not leave the Gel Pads exposed for too long, or they will dry out. Do not place your Gel Pads or Wings in heat or direct sunlight; store them in a cool, dry area.
Still having issues with your SaeboStim One? Open a Support Ticket for further assistance.
Here’s a digital copy of the SaeboStim One Instruction Manual

This video will show you what you will receive in your SaeboStim One box.
This video features answers to frequently asked questions about the SaeboStim One.
SaeboGlove
This video will answer why your SaeboGlove might not fit properly.
This video will address issues such as thumb instability, thumb adducting or pulling towards the index finger, and achieving optimum position of the thumb for grasping.
This article will address how to avoid the SaeboGlove’s plastic wrist spiral from hitting or rubbing your large wrist bone (the radial head), located near the base of your thumb.
1. The SaeboGlove sliding down and butting up against the bone is the most common reason for this. Listed below are some tips to help.
- Reposition your SaeboGlove as proximally (in the direction of your shoulder) as possible.
- Re tighten the forearm and hand straps as securely as you can. If these are loose, the non slip gel liner won’t be as effective.
- If the above doesn’t help, you may consider using Dycem (a non slip material) around the forearm before putting the SaeboGlove on.
2. Check that the sizing of the SaeboGlove is correct.
- The fingers should go as close to the end of the material liner as possible. If you can’t do this, the material liner may be too small.
- The material liner should fit down to the webspace between each finger. If this isn’t possible, the material liner may be too small.
- If you have excess material at the tips of the fingers and it is baggy around the fingers, the material liner may be too big.
- The plastic wrist splint ideally shouldn’t extend past the edges of the top of the hand. If it does, this is an indicator it is too large.
If you are unsure about the fit of your SaeboGlove please contact our Support Team for advice.
This article will give you tips on how to address this.
It is worth noting that bunching of material near the MCP joints is not uncommon and won’t necessarily hinder effective use of the SaeboGlove. However, to try to reduce it we have some tips below to try.
- The SaeboGlove may have migrated distally/slipped down. To resolve this, follow the steps in the SaeboGlove Manual for distal migration on page 19. For some users, you may need to reposition your SaeboGlove periodically during the day when wearing it for prolonged periods of time.
- Check that the sizing of the SaeboGlove is correct.
- The fingers should go as close to the end of the material liner as possible. If you can’t do this, the material liner may be too small.
- The material liner should fit down to the webspace between each finger. If this isn’t possible, the material liner may be too small.
- If you have excess material at the tips of the fingers and it is baggy around the fingers, the material liner may be too big.
- The plastic wrist splint ideally shouldn’t extend past the edges of the top of the hand. If it does, this is an indicator it is too large.
If you are unsure about the fit of your SaeboGlove please contact our Support Team for advice.
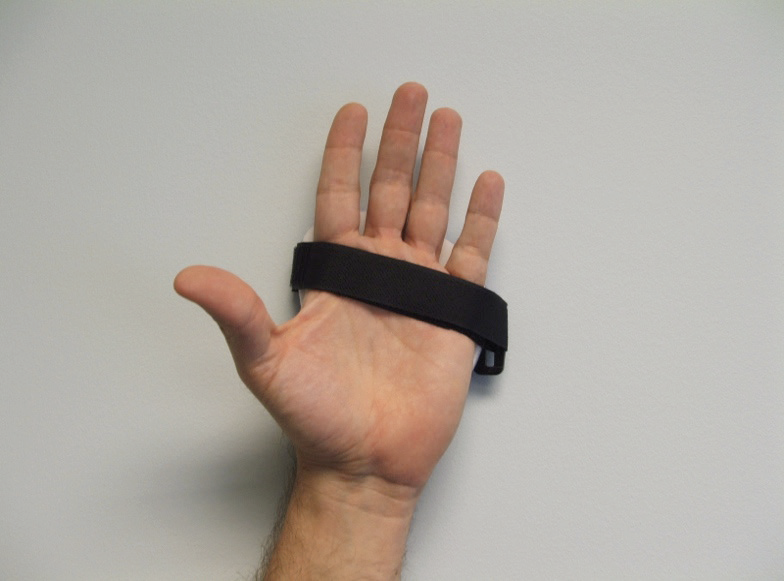
- Wrist Splint: Small, Medium and Large
- Glove Liner: XS, S, M, L, XL
- The Glove liner can be removed from the wrist support and be hand cleaned with lukewarm water and soap.
- The wrist splint can be cleaned with alcohol wipes/anti-bacterial spray.
- Some ability to flex his or her fingers is ideal. If the client cannot flex his or her fingers, the clinician can use electrical stimulation to the finger flexors to facilitate squeezing.
- Must exhibit less than mild hypertonicity. If greater, than the client needs the SaeboFlex.
- No contractures
- Cognitively intact
There are 3 groups that qualify for the SaeboGlove ranging from those with some finger extension, to those with very little extension.
There are 3 groups of clients that qualify for the SaeboGlove: High-Level Neuro, Low-Level Neuro, and Orthopedic.
1. High-Level Neuro: These clients exhibit some finger extension but not full. They may have used the SaeboFlex, but are no longer challenged by it. They may exhibit mild hypertonicity, but not enough to prevent him or her from extending the fingers to some degree. They still suffer from hand function impairment including fine motor control, weak flexors and weak extensors. Numerous repetitions may be difficult due to weak finger extension strength and endurance. Radial tone may be more prevalent (thumb/index finger). They are typically in the outpatient setting.
2. Low-Level Neuro: This group exhibits very minimal or no wrist/finger extension and are very low tone or flaccid. They are not impeded by hypertonicity. They are typically in the inpatient setting. A majority may require NMES/FES with the Glove.
3. Orthopedic: This group typically has a diagnosis of radial nerve palsy/brachial plexus injury/fractures. They exhibit wrist drop and lack finger extension strength.
For those who are appropriate, the Glove is a quicker, easier, more functional option.
For appropriate Glove patients:
- Quicker and easier to fit.
- Glove allows for full joint motion where the SaeboFlex is primarily limited to PIP movement.
- Glove is designed more for functional tasks.
- Finger tips are not blocked by the digit caps so clients can receive the tactile experience.
- Clinicians do not need to be Saebo Trained.
The SaeboGlove is designed for hands that are very loose and flexible, with little – to no tone. The SaeboFlex is designed for hands that have much more tone.
- The SaeboFlex is a high profile, out-rigger style splint made from durable rigid parts used to support and assist individuals with increased tone. The SaeboGlove is a low profile splint made from soft fabric and semi-rigid parts used for patients that do not exhibit hypertonicity.
- The SaeboGlove parts do not have the material strength needed to re-extend the digits following grasping of a client that exhibits increased tone. These clients would need the SaeboFlex.
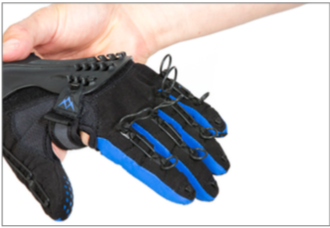
This article will give you tips on preventing your elastic tensioners coming off when using your SaeboGlove
- When attaching the elastic tensioners to your SaeboGlove, ensure you apply extra tension to securely lock the elastic tensioner into the groove of the finger and thumb hooks.
- When removing your SaeboGlove, detach the elastic tensioners that cross the knuckle joints as shown in the diagram below (note that you don’t need to completely remove the elastic tensioner from both sides). This will stop them coming off when removing the SaeboGlove.
This video will show you what you will receive in your SaeboGlove box.
Need a digital copy of the SaeboGlove Instruction Manual?

Get a good fit with these sizing tips for the SaeboGlove! [VIDEO]
Before ordering your SaeboGlove, make sure you properly measure your hand to find the most appropriate size glove and splint for your hand and wrist. Watch this brief measuring tutorial video for instructions on how to measure your hand for the SaeboGlove:
You can also refer to our SaeboGlove Sizing Guide below for additional support.

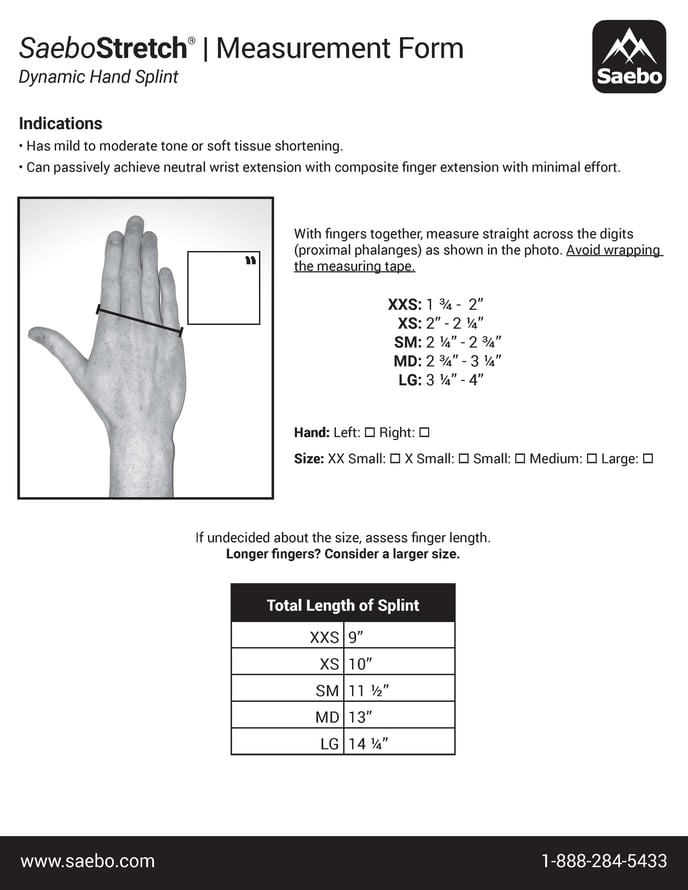
SaeboStretch
To ensure you order the correct size, please refer to the sizing video and measurement guide below.
This video will show you what you will receive in your SaeboStretch product box.
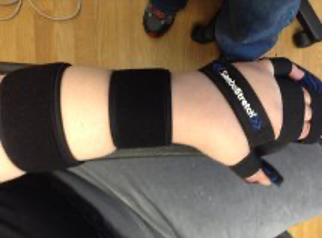
Here are visual donning instructions for the SaeboStretch dynamic hand splint
Step 1: Undo the straps.
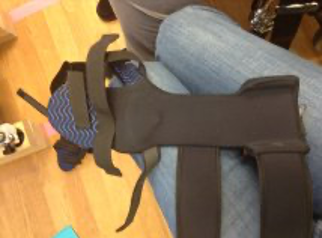
Step 2: Place the splint under the forearm.
Step 3: Separate the little (pinky) finger away from the ring finger.
Step 4: Place finger straps between the little (pinky) finger and ring finger.
Step 5: Secure the wrist strap.
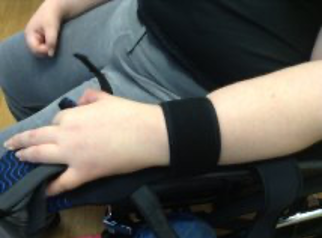
Step 6: Secure the forearm strap.

Step 7: Press the hand down and secure the strap diagonally across the hand.
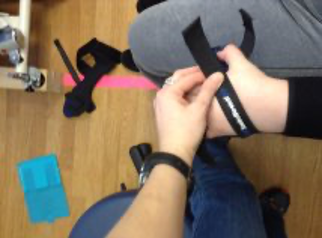
Step 8: Secure the other finger straps across the hand.
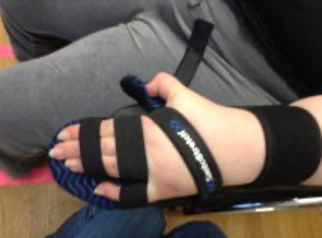
Step 9: Using two hands, straighten the thumb.
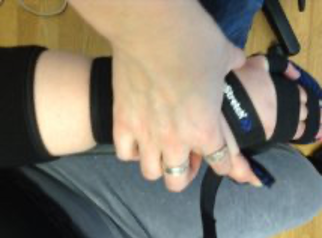
Step 10: Secure the thumb strap.
Watch the video below for additional assistance in fitting the SaeboStretch.
Here’s a digital copy of the SaeboStretch User Manual

This video features answers to frequently asked questions about the SaeboStretch.
For your convenience, here are the time stamps of the video and the associated topics they cover.
0:00 Introduction
0:28 Will the SaeboStretch improve my hand function?
1:40 How do I know my size?
2:44 How do I know if I applied the SaeboStretch correctly? (Step-by-step instruction)
6:18 How long should I wear my splint?
7:04 How do I stop my fingers from pulling out of my straps?
8:28 Conclusion
SaeboStim Micro
The Lead Wires connect the control unit of the SaeboStim Micro to the electromesh glove and sleeve. If you disengage the Lead Wires from the control unit, reconnecting is very simple. The Lead Wires are connected by snaps.
To reconnect the Lead Wires to the control unit, insert the snap stud
end into the inside position of the slot and slide toward the
outside position to lock in place.
- With the battery compartment of the control unit facing you, the Red Lead Wire is placed on the right-hand side of the unit and the Black on the left side. The Black Lead Wire will need to be pushed down and slid to the left to secure in place.

- The Red Lead Wire will need to be pushed down and slid to the right to secure in place.

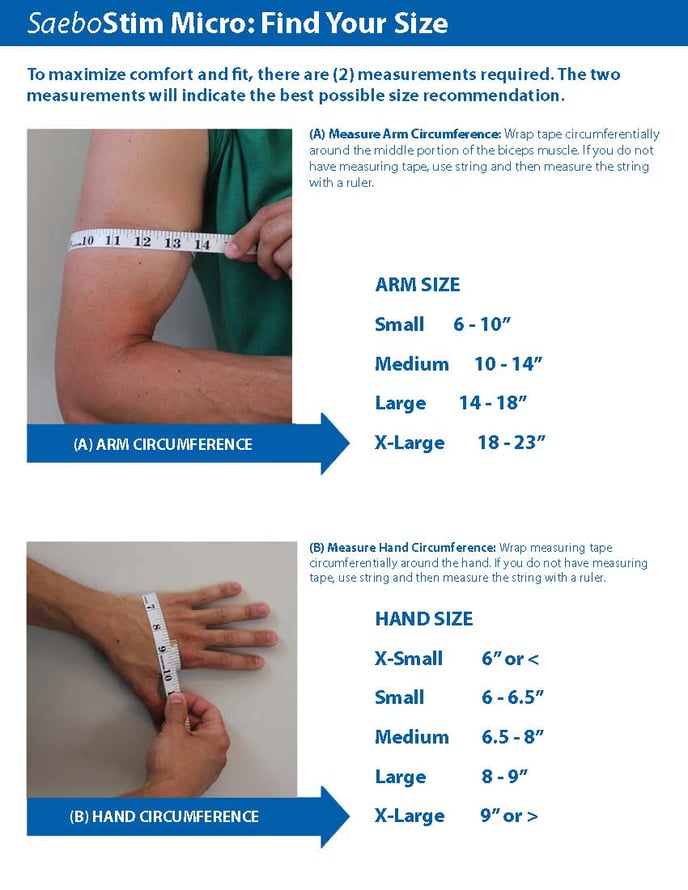
To ensure you order the appropriate size SaeboStim Micro, please use the measurement guide below.
This video will help you understand why you might not be able to feel the SaeboStim Micro at its highest setting.
This video features answers to frequently asked questions about the SaeboStim Micro.
If you think your SaeboStim Micro isn’t working, here’s how to test how conductive your unit is.
Step 1:

- Remove the battery cover
- Make sure the battery is inserted correctly as the diagram shows
- Replace the battery cover
Step 2:

- Connect the black lead to the Electro-Mesh Glove
- Connect the red lead to the elbow Sleeve
- Place all three pieces of the SaeboStim Micro on a flat surface
Step 3:

- Turn on the SaeboStim Micro
- Increase the intensity to 50-60 volts
Step 4:

- Place a small amount of Thera-Cream on the tip of your pointer finger

- Press the tips of your pointer fingers together spreading the Thera-Cream
Step 5:

- Quickly, place the tips of your right and left pointer fingers on the Electro-Mesh Glove and elbow Sleeve
- You should feel the electricity
- If not, increase the voltage to 100 and re-test
The hand contains many nerve endings that allow you to feel the stimulation more than what you will feel in the forearm/elbow area. This does not mean you aren’t getting stimulation to those areas.
The more melanin you have in your skin (the darker your skin color), the higher you have to increase the voltage to feel the stimulation, due to the thickness of the epidural layer of the skin. Also, the older you are, the higher you have to increase the voltage.
Here’s a digital copy of the SaeboStim Micro Instruction Manual

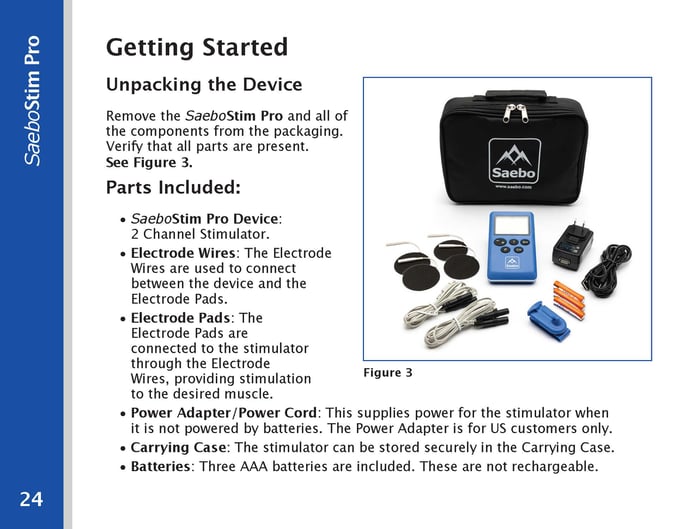
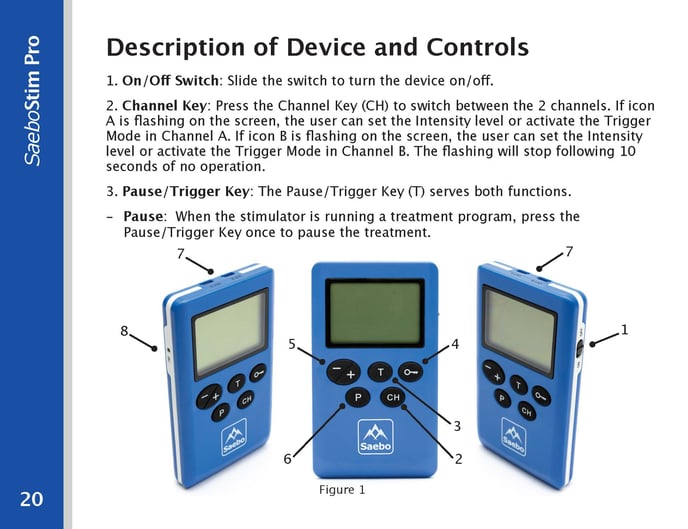
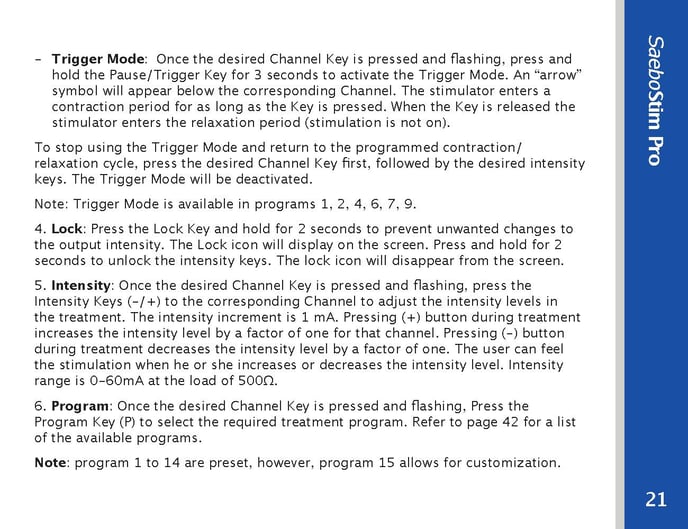
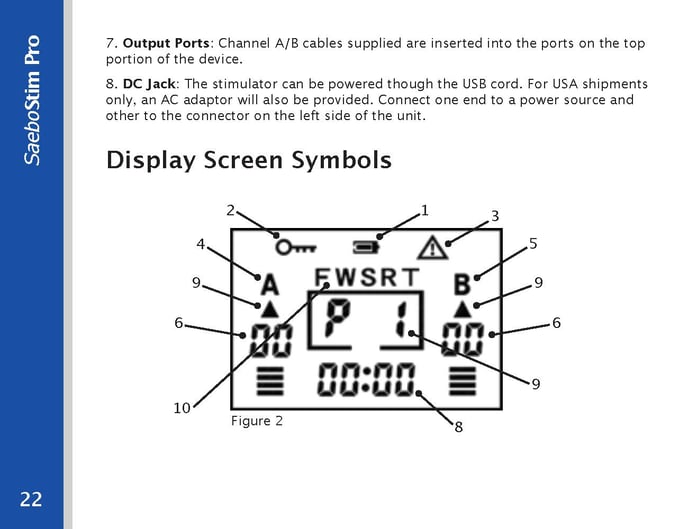
SaeboStim Pro
This video will answer how SaeboStim Pro can be used to treat pain.
Watch the whole FAQ video, or jump to 0:42 for the answer to your pain.
This video will answer why and when you need to use the trigger button on your SaeboStim Pro.
This video features answers to frequently asked questions about the SaeboStim Pro.
Here is a digital copy of the SaeboStim Pro user manual. Please reference this manual if you have questions about how to use your SaeboStim Pro.
The hand contains many nerve endings that allow you to feel the stimulation more than what you will feel in the forearm/elbow area. This does not mean you aren’t getting stimulation to those areas.
For quick reference, here are important page excerpts from the manual.
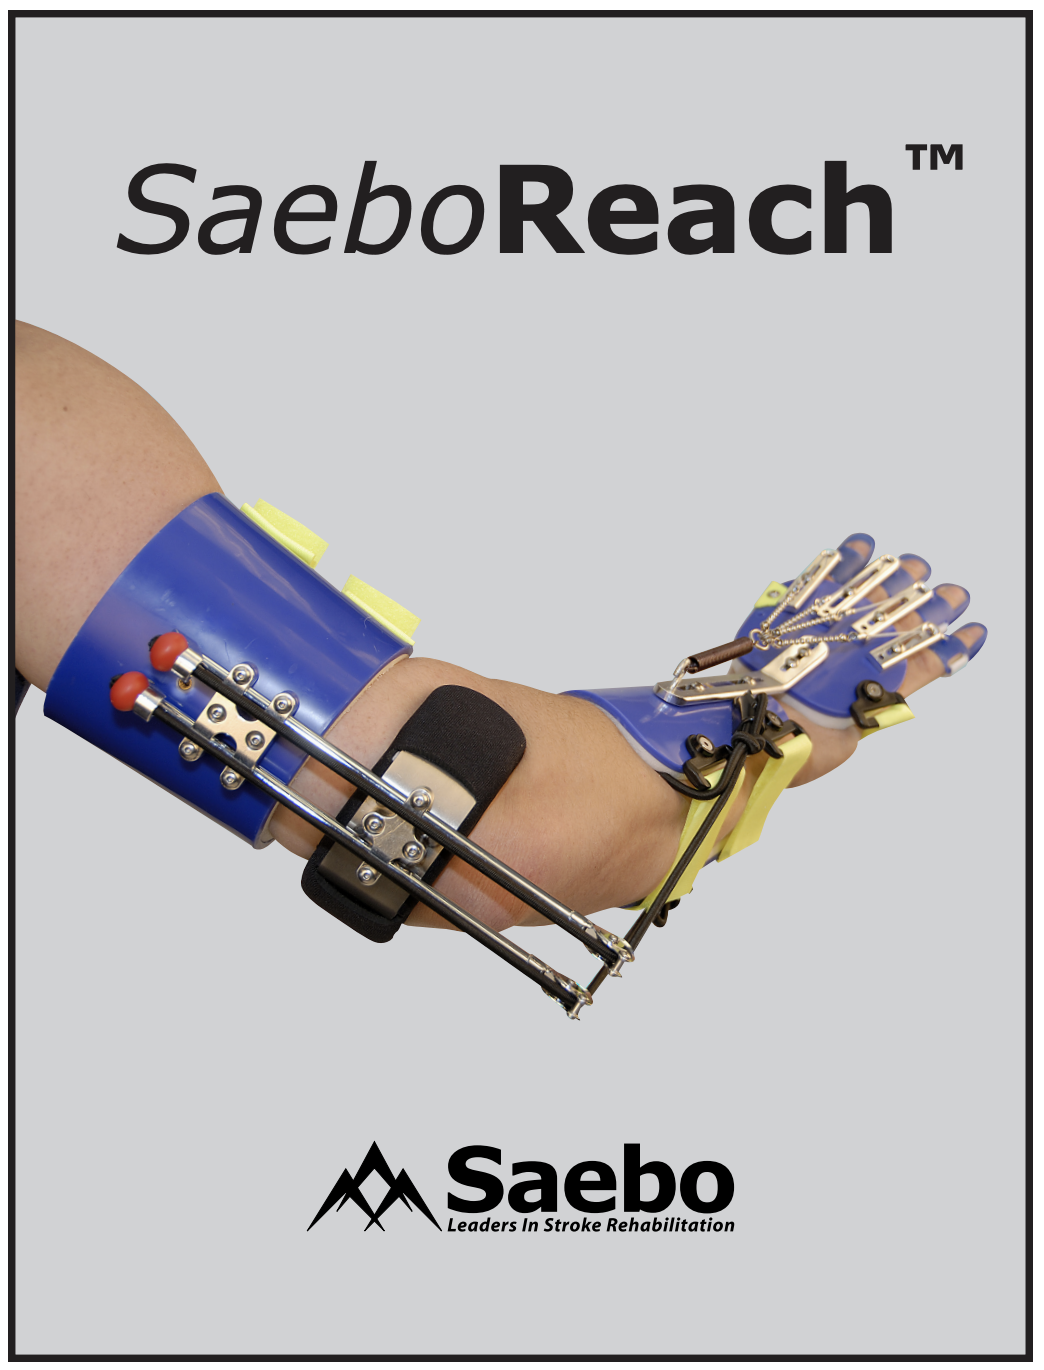
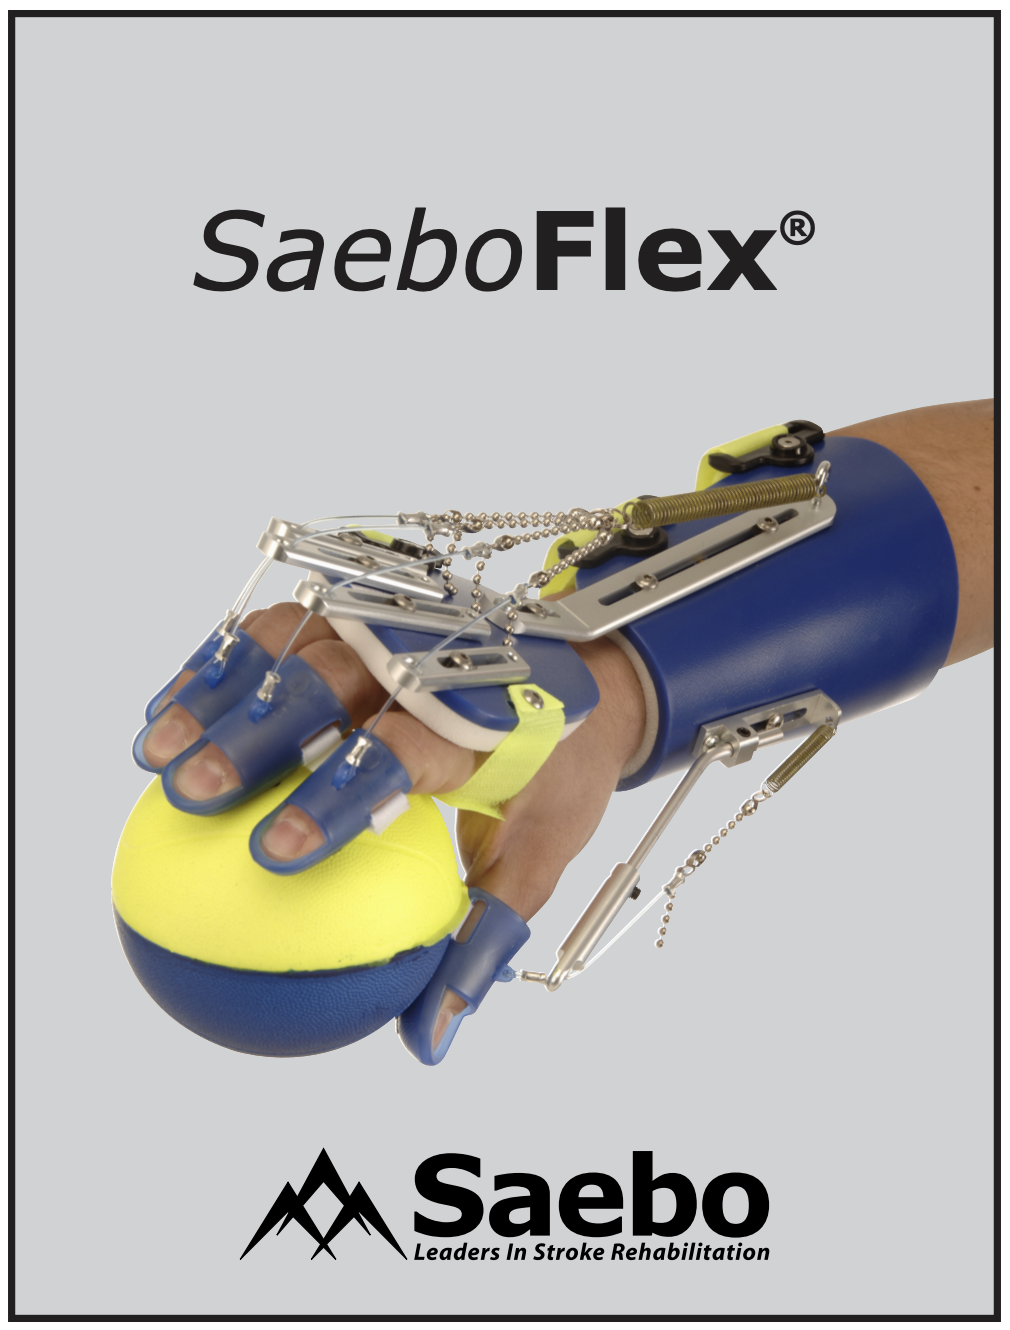
SaeboFlex
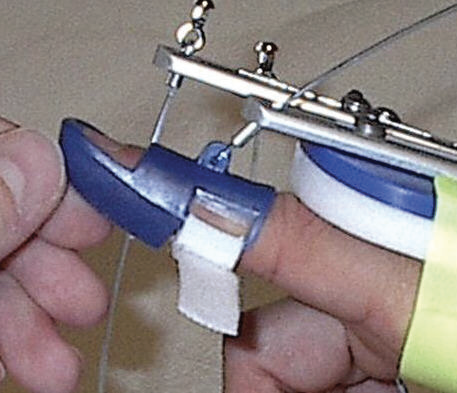
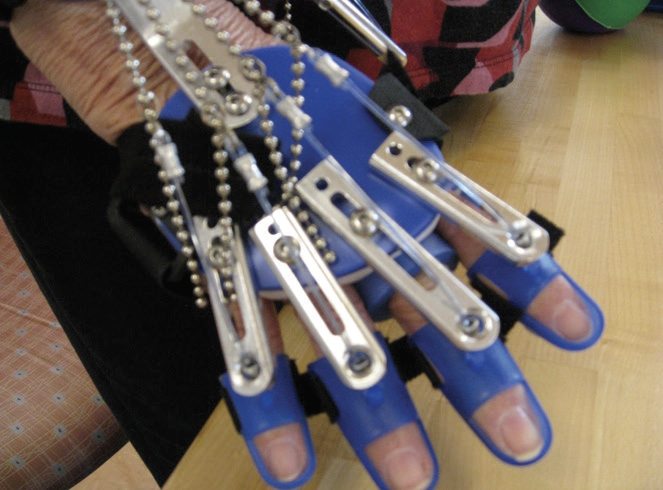
While in the SaeboFlex, clients with hypertonicity and/or soft tissue shortening can exhibit finger deviation during grasping.
Finger deviation can occur in a radial or ulnar direction. The below is an example of the long finger deviating in a radial direction. Although, the deviation appears to be occurring at the PIP joint of the 3rd digit, however, the proximal phalanx is actually “rotating” at the MCP joint causing the deviation. The goal will be to eliminate or reduce the rotation or “spinning” of the respective MCP joint.


This rotation can be the result of a number of issues, which include:
• MCP joint laxity
• Weakness of the intrinsic muscles of the hand
• Soft-tissue shortening and/or hypertonicity
• Fatigue
Did you know? If deviation is not seen initially, but occurs after the client has been grasping & releasing for several repetitions, then fatigue is often the cause.
Strategies to Consider:
Since deviation is a result of rotation of the proximal phalanx at the MCP joint, the first step is to ensure optimum stability.
1. Position the Dorsal Hand Piece as close as possible to the PIP joint of the 3rd digit, but without covering the PIP joint of the 2nd or 5th digit.
 |
 |
| Dorsal Hand Piece position for mild to moderate tone. | Dorsal Hand Piece position for severe tone. |
2. Make sure the Dorsal Hand Strap is snug and positioned on the volar surface of the metacarpal heads.
Note: The Dorsal Hand Strap can be positioned more proximal or distal by moving the strap on the radial side to one of the three pre-drilled holes.

3. Position the Finger Lead Mounts closer to a 90° angle of pull (but not greater) as this will provide more control distally. If the angle is greater than 90°, the Digit Cap will migrate off the tip of the finger.
4. Splay the Finger Lead Mounts in the opposite direction of the deviation. Loosen the screw on the Finger Lead Mount and splay ulnarly to reduce radial deviation and radially to reduce ulnar deviation.
 |
 |
5. Apply a Buddy Strap to “pull” the proximal phalanx back under the dorsal hand piece if the index finger is deviating ulnarly (toward the palm of the hand), or if the little finger is deviating radially (toward the palm of the hand).

6. Place a piece of blue foam tubing, used to build up handles, over the proximal phalanges of the digits that are deviating. Simply cut enough of the foam tubing to cover the proximal phalanx. Make sure that the foam does not block the PIP joint. This will provide support for the MCP joints limiting the amount of rotation that occurs. If this does not work, try placing an additional foam ring on the adjacent digit.
 |
 |
7. Apply a bi-pull technique (2 lines of pull) to the deviating finger(s). This allows you to use a second line on the same finger to “pull” the digit in the opposite direction of the deviation.
Note: Please refer to the step-by-step video instructions for the bi-pull technique on the training portal
8. Change from a 35° wrist mount to a 15° degree wrist mount. By lowering the wrist angle, the degree of stretch provided on the long finger flexors will reduce, therefore, minimizing the amount of deviation at the digits.
Important: It is recommended that you try to resolve the issue by performing the bi-pull technique first before considering a lower wrist mount angle. By keeping the wrist mount at 35°, this will maintain the optimum stretch on the long finger flexors during repetitive grasp and release which may help reduce hypertonicity.
This video will show you what you’ll receive in your SaeboFlex/ SaeboReach product box.
Here are some tips for treating patients with lower levels of function.
Low-Level Client with Hypotonicity
Goals:
• Increase proximal and distal AROM and strength
• Improve motor control
• Initiate/facilitate/reinforce independent grasp and release
Major Focus: Increase recruitment of the weak agonist
Treatment Suggestions:
1. Ball Placement
If the client’s shoulder is very weak and he or she has difficulty consistently positioning the hand in the correct relationship to the ball (1/3rd of the ball protruding from the web space), or he or she bumps the ball around the table while trying to grasp it, you may need to “tee up” the ball (stabilize on table) at first until the shoulder is stronger.
In addition, you may also want to provide hand-overhand assistance with grasp and release. Be sure to position the client’s hand over the ball so that 1/3 of the ball is outside the web space. Have the client experience repeated success with grasping and releasing the ball with your assistance. As the client progresses, start to provide less assistance until independence is achieved.
2. Shoulder Program
a. Have the client use a crate that is low enough for repeated success, but high enough to be challenging. The major emphasis is repetitions so increased strength can be achieved. In the beginning, the client may be able to only perform 20 or 30 reps. If necessary, modify the crate height (lower the crate) to increase the repetition count.
b. Performing grasp and release to the contralateral side (humeral adduction and IR) is typically easier for the low-level client. To advance, have the client attempt to grasp and release to the ipsilateral side. The exercise will require the client to have some abduction and ER.
c. As the shoulder strength improves, it will be important to re-evaluate the client’s movement deficits so appropriate exercises can be administered.
3. Biceps Program
a. Have the client grasp the ball from the table-top with assistance if needed (stabilize ball or hand-overhand). While maintaining grasp, the client should flex the elbow to 45 degrees and return to neutral. Have the client maintain grasp while relaxing the elbow flexors during the descent. The client should straighten the elbow as much as possible and release the ball onto the table; there is no specific target. As the client improves, increase the elbow flexion active range of motion (i.e., 0-90, 0-120 etc.).
b. Have the client grasp the ball from the table-top with assistance if needed (stabilize ball or hand-overhand). Maintain grasp and perform 0-45 degrees of elbow flexion. Have the client maintain grasp while relaxing the elbow flexors. The client should straighten the elbow as much as possible and release the ball in a small 4-6” tube on table. As the client improves, increase the elbow flexion (i.e., 0-90, 0-120 etc.).
c. Have the client grasp the ball from the table-top with assistance if needed (stabilize ball or hand-overhand). Maintain grasp and perform 0-45 degrees of elbow flexion. Have the client maintain grasp while relaxing the elbow flexors. The client should straighten the elbow as much as possible and release the ball into a crate on floor or chair on the ipsilateral side. As the client improves, increase the elbow flexion (i.e., 0-90, 0-120 etc.).
4. Strengthen Flexors
Increase the resistance of the springs on the SaeboFlex to strengthen finger and thumb flexors.
5. Combine Other Treatment Modalities
a. Consider the SaeboGlide or SaeboMAS for shoulder/elbow strengthening.
b. Consider electrical stimulation before/after/during Saebo treatment.
Low-Level Client with Hypertonicity
Goals:
• Increase proximal and distal AROM and strength
• Improve motor control
• Decrease hypertonicity
• Initiate volitional isolated multi-joint movement
• Initiate/facilitate/reinforce independent grasp and release
Major Focus: Teach the client how to “shut off” his or her tone
Treatment Suggestions:
1. Train the client to bring the hand back to his or her side in between grasp and release reps to “reset” and allow the upper limb (shoulder, biceps and finger flexors) to relax.
2. Keep the ball placement very close to the client’s body so that he or she does not have to reach out far (i.e., less proximal exertion = less biceps spasticity). Less proximal exertion creates less shoulder and elbow flexion and therefore less tone is produced.
3. If the client’s shoulder is very weak and he or she has difficulty consistently positioning the hand in the correct relationship to the ball (1/3rd of the ball protruding from the web space), or he or she bumps the ball around the table while trying to grasp it, you may need to “tee up” the ball (stabilize on the table) at first until the shoulder is stronger. In addition, you may also want to provide hand-overhand assistance with grasp and release. Be sure to position the client’s hand over the ball so that 1/3 of the ball is outside the web space. Have the client experience repeated success with grasping and releasing the ball with your assistance. As the client progresses, start to provide less assistance until independence is achieved.
4. Shoulder Program
a. Have the client use a crate that is low enough for repeated success, but high enough to be challenging. The major emphasis is repetitions so increased strength can be achieved. In the beginning, the client may be able to only perform 20 or 30 reps. If necessary, modify the crate height (lower the crate) to increase the repetition count.
b. Performing grasp and release to the contralateral side (humeral adduction and IR) is typically easier for the client. However, please note that tone in the hand may initially increase with horizontal adduction and internal rotation. You may need to adjust the SaeboFlex for this increased tone (i.e., shorten the bead line or switch to a stronger spring).
c. To further challenge the client, have him or her attempt to grasp and release it to the ipsilateral side. The exercise will require the client to have some abduction and ER.
d. Remember to have the client fully relax at the shoulder, elbow, and fingers before the next repetition.
e. As the shoulder strength improves and tone reduces, it will be important to re-evaluate the client’s movement deficits so appropriate exercises can be administered.
5. Biceps Program
a. Have the client grasp the ball from the table-top with assistance if needed (stabilize ball or hand-overhand). While maintaining grasp, the client should flex the elbow to 45 degrees and return to neutral. Have the client maintain grasp while relaxing the elbow flexors during the descent. The client should straighten the elbow as much as possible and release the ball onto the table; there is no specific target. As the client improves, increase the elbow flexion active range of motion (i.e., 0-90, 0-120, etc.).
b. Have the client grasp the ball from the table-top with assistance if needed (stabilize ball or hand-overhand). Maintain grasp and perform 0-45 degrees of elbow flexion. Have the client maintain grasp while relaxing the elbow flexors. The client should straighten the elbow as much as possible and release the ball in a small 4-6” tube on the table. As the client improves, increase the elbow flexion (i.e., 0-90, 0-120, etc.).
c. Have the client grasp the ball from the table-top with assistance if needed (stabilize ball or hand-overhand). Maintain grasp and perform 0-45 degrees of elbow flexion. Have the client maintain grasp while relaxing the elbow flexors. The client should straighten the elbow as much as possible and release the ball into a crate on the floor or chair on the ipsilateral side. As the client improves, increase the elbow flexion (i.e., 0-90, 0-120, etc.).
6. The above-elbow tasks challenge the client to begin to control different UE muscle groups independently. The client will learn how to relax or shut off one flexor group (i.e., biceps) while sustaining flexion in the hand (i.e., grasping the foam ball).
7. Clients with severe hypertonicity have a difficult time firing the finger flexors while relaxing the elbow flexors. Teach the client to grasp the ball without simultaneously firing the elbow flexors. For example, in a standing position with the elbow straight have the client grasp the ball from the table.
If you notice the biceps activated during the initial grasp (i.e., elbow flexion), pause and verbally cue the client to avoid elbow flexion when squeezing. This process will take repeated attempts before success is seen.
8. Gentle Squeeze Clients with severe hypertonicity have a difficult time learning to shut off or relax their finger flexors; they tend to “crush” the ball. Teach the client to avoid over-gripping when squeezing. The lighter the client squeezes the ball, the easier it is for him or her to release. Teach the client to envision the ball as an egg. When squeezing the ball, cue the client to activate the finger flexors slowly and very softly to not break the egg.
9. Grade the Recruitment Decrease the resistance of the springs on the SaeboFlex to practice grading the recruitment of the finger and thumb flexors. With a lighter spring, the client will be required to generate minimal recruitment of the finger and thumb flexors.The lighter the squeeze, the less effort required to relax.
10. Reps, Reps, Reps Emphasize numerous repetitions for grasp and release. In order to decrease hypertonicity, the client will have to perform hundreds of reps. If the target (i.e., crate) is too high for the client and he or she is unable to achieve numerous reps, then lower the target.
11. Combine Other Treatment Modalities
a. Consider the SaeboGlide or SaeboMAS for shoulder/elbow strengthening.
b. Consider electrical stimulation before/after/during Saebo treatment.
Here is a digital copy of the SaeboStim Pro user manual. Please reference this manual if you have questions about how to use your SaeboStim Pro.
Clinicians can use this helpful guide when treating patients with higher levels of function.
- Once the client is displaying fair muscle strength (3/5) or greater in the shoulder and elbow, begin to apply resistance (manually, T-Band, etc.). As the client performs isotonic shoulder elevation/extension or elbow flexion/extension, provide manual resistance to increase recruitment. For a home program, teach the client to apply T-band to the wrist mount of the SaeboFlex to increase resistance.
- When developing an exercise plan, emphasize multi-directional movements to further challenge the client (i.e., ER followed by horizontal adduction and elbow extension).
- When appropriate, work on reaction time. For instance, have the client positioned at one end of the table and the therapist at the other end. Roll the foam balls down the table, one at a time and have the client grasp and release the ball into a crate on the floor. To advance, increase the speed and frequency of balls being delivered.
- As the client decreases his or her tone and learns how to effectively deactivate the flexors, it is time to decrease the spring strength for the fingers and thumb. The weaker the spring, the more challenging it is for the client to deactivate the flexors and release the ball. Gradually progress the client to the weakest spring (i.e., silver). If he or she can release with the silver spring, consider lengthening the bead line to further challenge the client. One additional tip is to switch from a spring to a rubber band to make it further challenging. Please remember to do a bead count. If you change the bead length during treatment at your clinic, you will need to re-set the beads back to the original length for the HEP.
- Releasing the ball (deactivating the flexors) during a table-top activity is much easier than during a high-level shoulder/elbow activity (increase proximal exertion). After you successfully switch to a weaker spring, progress the client from low-level proximal drills to high-level drills. It will increase the challenge for the client to deactivate the flexors.
- In addition to decreasing the spring strength for tone management, consider switching to a stronger spring on certain days to focus on improving finger and thumb strength.
- As clients progress, consider the SaeboGlove as an add-on, or replacement, to the SaeboFlex.
Many therapists have indicated that fitting the thumb is one of the most problematic areas. Below are some recommendations and helpful tips that may improve your success in properly fitting and positioning the thumb.
1. Digit Cap
It is very important that you have the proper sized Digit Cap for the thumb. In order to correctly measure your patients’ Digit Caps, it is essential that they trim their nails before assessing.
Remember:
- The Digit Cap should fit snug so that the tip of the thumb makes contact with the end of the Digit Cap. If the client’s thumb does not make contact with the end of the Digit Cap, and the next larger size feels a bit loose, pad the roof of the Cap with self-adhesive closed cell foam padding (1/8” or 1/16”).
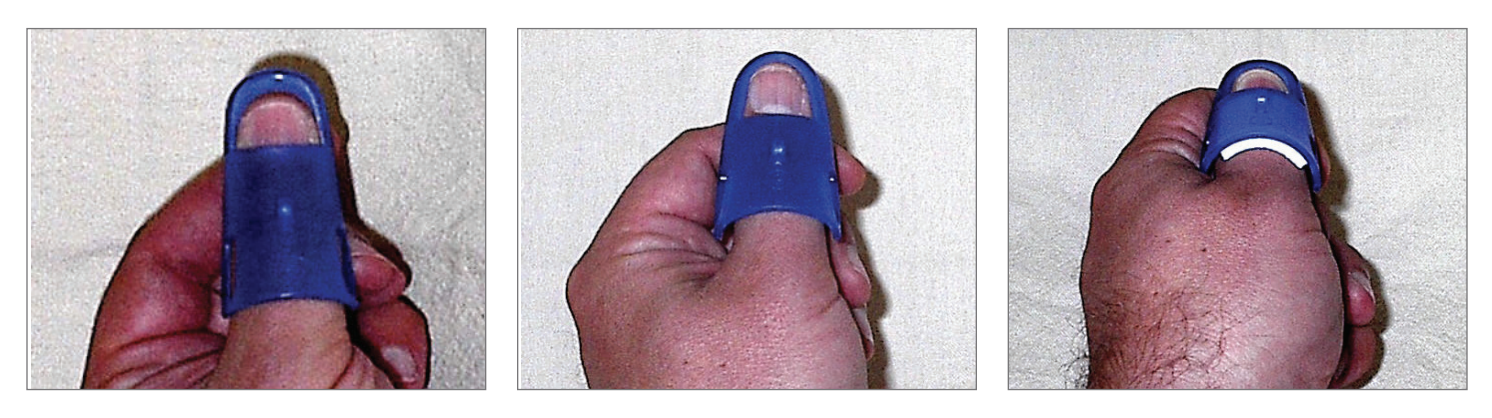
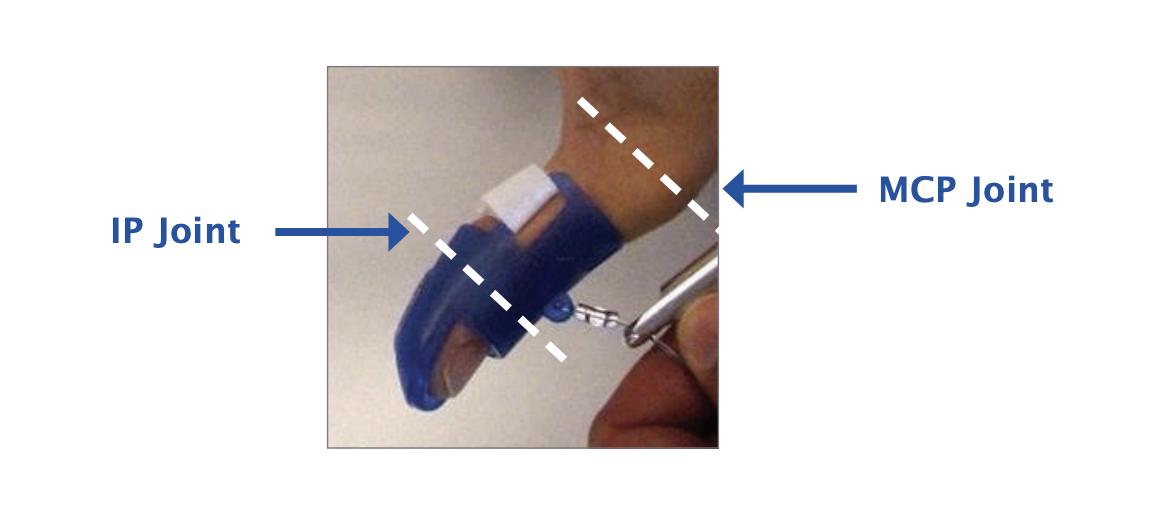
- The length of the Cap should be long enough to block IP flexion, with the proximal edge coming as close to, but not covering, the MCP joint of the thumb. If the Digit Cap is not long enough, the IP joint will flex resulting in pressure over the dorsum of the IP joint and compromise the effectiveness of the thumb position for grasping.
2. Thumb Assembly
The Thumb Assembly consists of 3 parts: the Thumb Mount (attached to the forearm shell), the Thumb Lead Mount (bar with the bent angle), and the Thumb Line Guide (hole on the end where the line passes through).
The Thumb Assembly allows for length adjustments (both in a proximal and distal direction) as well as rotational adjustments, which allows for positioning the thumb in a radial or palmar direction. 
3. Thumb Fitting
Optimal Position
 |
The desired position for the thumb is halfway between palmar and radial abduction, or otherwise known as “thumbtion”. In this position, the web space is on maximum stretch, and the MCP joint is fully extended (there should not be slack at the web space). |
 |
Step 1:
Remove the Thumb Lead Mount and loosen the Allen screws on the Thumb Mount. |
 |
Step 2:
Don the thumb Digit Cap. Passively place the thumb in the desired position of “thumbtion” with the web space on stretch and the MCP extended. |
 |
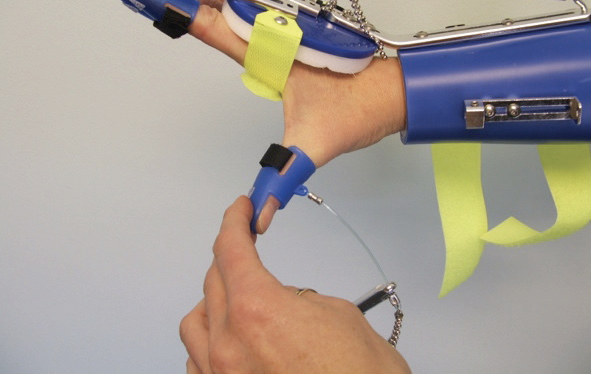
Step 3:
Place the Thumb Lead Mount back into the Thumb Mount. Rotate the Thumb Lead Mount up or down so it aligns with the position of the thumb. |

Make sure the crimp is making contact with the Thumb Line Guide (blue arrow) |
Step 4:
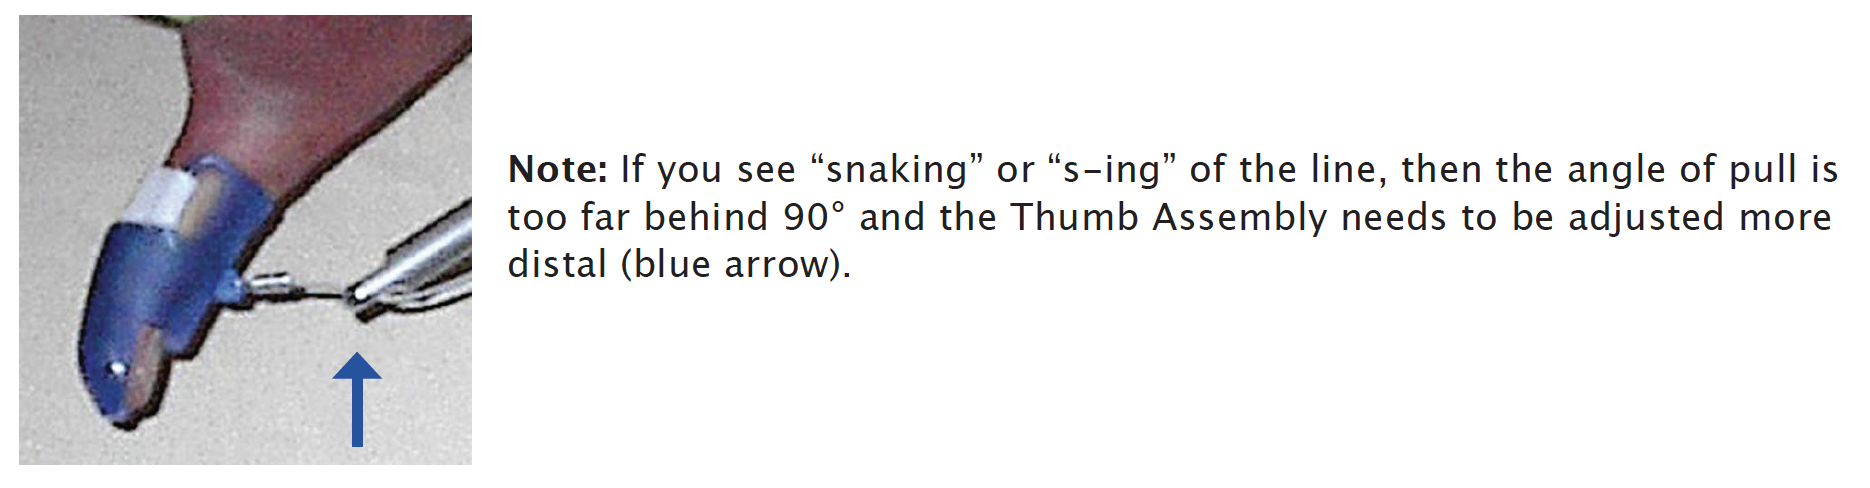
To set the angle of pull just behind 90°, you will next adjust the overall length of the Thumb Assembly and shorten the Bead Line appropriately. |
Note: Since the Thumb Lead Mount and the Thumb Line Guide are assembled and shipped to you in the shortest position, the only place you can shorten the Thumb Assembly is by sliding the Thumb Mount proximal on the Forearm Shell. This will help position the thumb further proximal to apply an adequate stretch on the web space.*
*In looking at tech support photos submitted by therapists, a majority of clinicians do not have an adequate stretch on the web space because they failed to move the Thumb Mount proximally.
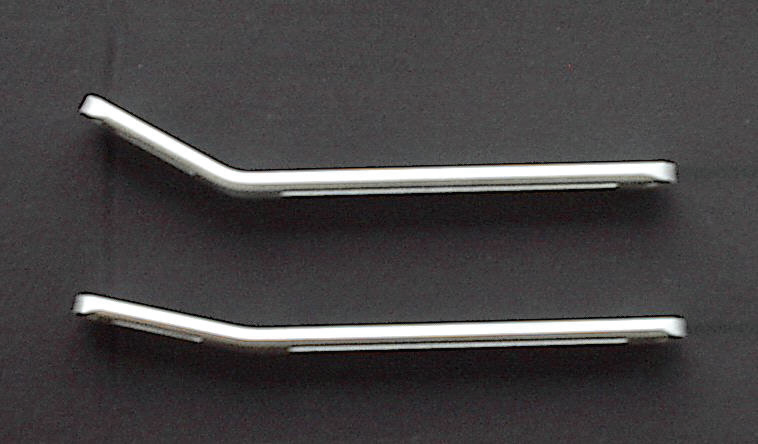
4. Bending the Thumb Lead Mount
If your client has a large hand or a long thumb, you may have to bend the Thumb Lead Mount to increase the angle and provide optimum stretch on the web space.
Steps:

1. Remove the Saebo Flex from the patient’s arm.
2. Position the Thumb Mount and the Thumb Lead Mount in the shortest position.
3. Hold the Saebo Flex in one hand and grab underneath the Thumb Lead Mount with the other hand.
4. Pull the Thumb Lead Mount towards you to bend and increase the angle.
5. If you bend it too far, you can always push down on the Thumb Lead Mount to decrease the angle.
Note: It is not necessary to greatly increase the angle; a simple 5-10˚ is often sufficient.
5. Setting the Angle of Pull
It is recommended that the angle of pull on the thumb should be just behind 90° (approximately 80°).
To set the angle of pull further distal (just behind 90°), slide the Thumb Lead Mount and/or Thumb Line Guide distal. The amount of additional length needed to set the angle of pull will determine where you make the length adjustments.
For instance, if you need just a little more length, slide the Thumb Line Guide distal. Conversely, if a larger adjustment is needed, consider sliding the Thumb Lead Mount first, then slide the Thumb Line Guide for fine-tuning.

6. Positioning the Ball for Grasping

To assess the overall fit and thumb position, the client should grasp the ball while seated. When positioning the ball for grasping, half to 1/3rd of the ball should be exposed in the web space. The thumb and index finger should make contact with the ball prior to the client grasping.
As your client grasps the ball, you are observing for finger contact, finger deviation, and thumb contact and/or deviation.
When your client relaxes or “stops squeezing”, observe how long it takes to let go of the ball. If the client takes longer than 10 seconds to let go of the ball after 3 or 4 attempts to relax, consider shortening the bead line. If shortening the bead line does not work, then switch to a stronger spring.
Note: Support the client’s forearm with one hand while positioning the ball with the other hand. Do not have the client attempt the first few grasps without his or her forearm supported. The added support is needed to reduce the amount of tone that may occur with active shoulder exertion.
Refer to this guide when troubleshooting the SaeboFlex or SaeboReach (for Clinicians)
SaeboFlex
1. How do I prevent distal migration?
a) Reposition the Forearm Shell so it is proximal to the ulnar head. Make sure the Forearm Straps are tight to limit any distal migration.
b) Consider placing ventilated or perforated shelf liner that has been cut into a 2” band and wrap around the wrist. In addition, a wrist sweatband can fill in the additional space.
c) Finally, if the Forearm Shell is too large, you may need to re-measure and order a different size.
2. How do I know if the Dorsal Hand Piece is in the right position?
Position the distal edge of the Dorsal Hand Piece in relation to the PIP joint of the 3rd finger. If the client exhibits increased tone, move the Hand Piece closer to the PIP joint. With individuals with high tone, position the distal edge of the Dorsal Hand Piece approximately 1/8th inch proximal to the PIP joint of the 3rd digit. For those with less tone, position the distal edge of the Dorsal Hand Piece approximately ¼ inch proximal to the PIP of the third digit. Remember to not cover the PIP joints of any finger. Additionally, the distal edge of the Dorsal Hand Piece should not make contact with the proximal edge of the Digit Caps. If contact is made, the Hand Piece may push the Digit Caps distal.
3. How do I determine the correct angle of pull?
Ideally, the angle of pull should be just behind 90° (approximately 80°). When the finger is passively brought into extension so the dorsum of the finger is close to the underside of the Finger Lead Mount, the crimp can start to come through the hole (but not fully) in the Finger Lead Mount. However, the attachment site on the top of the digit cap should remain distal to the end of the Finger Lead Mount.
4. My client is exhibiting hyperextension of the MCP’s while in the SaeboFlex. What do I do?
a) MCP hyperextension is often eliminated simply by moving the Hand Strap distally to better support the MCP joint. There are three holes below the Hand Strap. Remove the screw on the radial side of the Hand Strap, move the Strap to the distal hole and re-secure.
b) Another method to alleviate MCP hyperextension is to place a piece of foam used to build up handles over the proximal phalanges of the digits that are hyperextending. Simply cut enough of the foam tubing to cover the proximal phalanx. Make sure that the foam does not block PIP flexion. This will act as a buttress against the Dorsal Hand Piece and prevent the MCP from hyper-extending.
c) If the above two suggestion do not work and the client exhibits moderate to severe soft tissue shortening, you may want to switch the wrist angle to a 15 degree wrist mount.
5. How do I position the thumb correctly?
The thumb should be positioned in a combination of palmar abduction and radial abduction (“thumbtion”). It is recommended that the web space be on a complete stretch. If the web space is not on stretch, then rotate the Thumb Lead Mount more until a stretched position is found. You may also need to bend the Thumb Lead Mount to find the adequate position.
6. My client’s thumb is medially rotating during grasping and the MCP is blanching white. What do I do?
When patient exhibits MCP flexion or dorsal subluxation, it causes the thumb to medially rotate during grasping. If this occurs, consider the following:
a) The client’s thumb may be in too much opposition or palmer abduction. If this is the case, please rotate the Thumb Lead Mount into more palmar adduction.
b) The client may need a Thumb Strap. To properly control MCP flexion or dorsal subluxation, we recommend applying Thumb Strap #1 (refer to course manual).
c) If the client’s thumb IP joint is very lax, and the above 2 solutions are not effective, contact Saebo to learn how to apply a custom thermoplastic gutter splint to correct the deformity.
7. My client exhibits MCP hyper-extension of the thumb. How do I protect it while in the SaeboFlex?
Your patient will require Thumb Strap #2 (refer to course manual). This strapping strategy will provide volar support that will prevent volar gliding in the MCP joint. Please keep in mind that some patients may exhibit severe hypermobility of the thumb and may need to apply both Thumb Strap #1 and #2.
8. What if my client’s thumb is making contact with the Thumb Lead Mount?
If you have repositioned the Thumb Mount and Thumb Lead Mount proximally, and your client’s thumb is still making contact with the Thumb Lead Mount, you will need to bend the Thumb Lead Mount to create more room. Prior to bending the Thumb Lead Mount, remove the SaeboFlex from your client. Then, loosen the set screw and align the Thumb Lead Mount so it is in a neutral position. Slide the Thumb Lead Mount proximally into the Thumb Mount as far as it can go and rescure. To stabilize, place your thumb onto the Thumb Mount and hold. With your other hand bend the Thumb Lead Mount just a few degrees.
9. What do I do if my client’s fingers are deviating?
In order to prevent deviation (radial or ulnar), it is recommended that you try the following in the order that they are presented. If the first technique is not successful, move on to the next one in succession.
a) Position the Dorsal Hand Piece more distally; this will give you better control over the proximal phalanges. Once the Hand Piece is more distal, please tighten the Hand Strap very securely.
b) Position the Finger Lead Mounts closer to a 90° angle of pull. This will provide more control distally.
c) Splay the Finger Lead Mounts in the opposite direction of the deviation. Loosen the screw on the Finger Lead Mount and splay ulnarly to reduce radial deviation and radially to reduce ulnar deviation.
d) Place a piece of blue foam tubing, used to build up handles, over the proximal phalanges of the digits that are deviating. Simply cut enough of the foam tubing to cover the proximal phalanx. Make sure that the foam does not block the PIP joint. This will provide support for the MCP joints limiting the amount of rotation that occurs. If this does not work, try placing an additional foam ring on the adjacent digit.
e) Bi-pull technique (refer to video on training portal).
f) Consider a 15° wrist mount.
10. What do I do if there is space at the distal end of the Digit Caps?
a) Distal migration can cause the Digit Caps to slide off; check the Forearm Shell to see if it has distally migrated. If so, see helpful hints for distal migration in this section.
b) The wrong angle of pull can cause the Digit Caps to slide distal. As a reminder regarding angle of pull, as you bring the dorsal aspect of the finger up to the underside of the digit cap, the crimp can start to come through the hole (but not fully) in the Finger Lead Mount. However, the attachment site on the top of the Digit Cap should remain distal to the end of the Finger Lead Mount.
c) If the Dorsal Hand Piece is making contact with the proximal end of the Digit Caps, move the Hand Piece proximal.
d) Make sure the Digit Caps are the correct size and that the Strap is tightly secured. If the Digit Cap is too small and the finger cannot be fully inserted, order a larger Digit Cap. If the Digit Cap is too large and the finger is loose inside the Cap, pad the roof of the Cap with closed cell adhesive backed foam.
11. What do I do if the proximal end of the Digit Cap is lifting off of the finger?
a) The size of the Digit Cap may be too large; consider using a smaller sized Digit Cap, but make sure the finger can be inserted fully into the Cap. If smaller-sized Digit Cap does not fit appropriately, then use the current larger Digit Cap and pad the roof with adhesive closed cell foam.
b) If the angle of pull is at or past 90°, the Digit Cap can lift off the finger. Check the angle of pull and consider readjusting as needed.
c) Make sure the Digit Cap strap is securely fastened.
d) If the Dorsal Hand Piece is too far distal, it may make contact with the proximal edge of the Digit Cap causing the Cap to slide distal and lift off the finger.
e) The proximal end of the Digit Cap may lift off the finger if the digit cap is too short. A longer Digit Cap that covers most of the middle phalanx will solve the concern. If you are using a C2 or F2, consider a C or F. If you are using an A, try B. Please keep in mind that the Digit Cap should not cover the PIP joint.
12. What do I do if the proximal end of the Digit Cap is digging into the middle phalanx of the finger?
If the angle of pull is significantly less than 90° (0-45°), then the angle is too shallow and the Digit Cap will dig into the middle phalanx. Simply loosen the screw on the Finger Lead Mount and move further distal, bringing the angle closer to 80°.
13. Only some of the fingers are making contact with the ball during grasping. How do I correct this?
a) Shorten the Bead Line of the finger or fingers that are making contact with the ball. This will assist in creating overflow to the fingers not making contact. If this doesn’t work, then;
b) Lengthen the Beads Lines of the fingers that are not making contact to decrease the tension to these fingers.
c) In the beginning, the ulnar digits may not consistently be able to make contact with the ball, which is fine. The fingers are still flexing and the muscle is activating regardless if the ulnar digits contact the ball.
14. How can I get my client to grasp the ball consistently?
a) Be sure to position the ball on the radial side of the hand when attempting to grasp.
b) The thumb must be in contact with the ball prior to squeezing.
c) The clinician can facilitate forearm pronation to make sure the thumb and index finger remain in proper position prior to grasp. Many clients have the tendency to supinate and flex their elbow when attempting to squeeze (flexor synergy pattern) so this technique can be valuable for successful grasp and release in the beginning.
d) Consider repositioning the traction tabs on the Digit Caps so better contact can be made with the ball or object.
e) If the client’s grip strength is weak, use less resistive Springs or rubber bands on the fingers or thumb. f) Consider using electrical stimulation in conjunction with the Saebo orthosis.
15. My client has a strong over-powering thumb. What can I do to control this?
Sometimes you will encounter a patient that has strong recruitment of thumb (i.e., IP flexion or CMC adduction). When the patient attempts to grasp the ball, he or she will exhibit very little control at the thumb. If you have seen the above, consider attempting to immobilize the joint. By doing this, you can minimize the unnecessary movements that occur during grasping. Please try the below steps:
1. Switch to the strongest Spring the patient can tolerate (i.e., blue).
2. Shorten the Bead Line to create more resistance.
3. Apply Thumb Strap #1; please secure the Strap tight.
4. If need be, apply a second Thumb Strap adjacent to the first Strap for extra stabilization. Please remember the thumb is overpowering for a reason. The above are good strategies to allow the patient to perform adequate grasp and release activities. In order to improve the thumb control, you will need to address the problem through agonist retraining exercises and possibly Botox.
16. My client just received Botox, and when attempting to grasp, the MCP joints flex, but the PIP joints remain at neutral. How can I get the PIP joints to flex more?
If your client is unable to flex his or her PIP joints following a Botox injection, consider the following:
1. Wrap strapping material (similar to the Digit Cap straps) around the affected proximal phalanges and the Finger Lead Mounts (see Swan neck troubleshooting strategies in the manual). By anchoring the fingers to the Finger Lead Mounts, the MCP joints remain in a neutral position during squeezing, therefore, causing the forces to be translated to the PIP joints instead. This may result in more flexion at the PIP joints.
2. In addition to anchoring the fingers to the Finger Lead Mounts, consider also loosening the Bead Line for the affected fingers so the PIP joints are prepositioned in slight flexion. This will make it easier to flex the digits.
3. Consider using a less resistive Spring or rubber band. Note: Botulinum toxin has been used clinically to reduce hypertonicity commonly seen after neurological injury. When also using the Saebo orthosis, it is important to consider the following:
• The primary muscles responsible for grasping with the Saebo Orthosis include the Flexor Digitorum Superficialis (FDS) and Flexor Pollicus Brevis (FPB). FDS flexes the PIP joints of the fingers, and FPB flexes the MCP joint of the thumb.
• If too much Botox is administered to the FDS or FPB, it may prevent the patient from being able to effectively use the Saebo Orthosis.
SaeboReach
1. What do I do if my client’s Above Elbow Cuff is too tight?
a. If the Cuff appears to be tight, you can stretch it by placing one side on the edge of the table, pull open the other side and push down. Alternatively, consider flattening the above Elbow Cuff on the floor and hold. It is recommended that you hold the stretched position for 45-60 seconds.
2. How do I get my client’s elbow to fully extend?
a. Make sure the Elbow Stop is positioned just proximal to the olecranon.
b. Slide the Outriggers more distal to change the angle of pull on the Tension Cords.
c. Shorten or tighten the Tension Cords.
d. Consider electrical stimulation to the triceps.
3. How do I prevent the Above Elbow Cuff from rotating?
a. Make sure the Above Elbow Cuff is centered on the belly of the biceps with the opening anterior on the upper arm.
b. Apply non-slip material underneath the Cuff to minimize migration.
c. Decrease the tension on the side of the rotation.
d. Increase the tension on the side opposite to the rotation.
e. Use only one Tension Cord instead of two by removing the Cord that is causing the rotation.
4. The Tension Cords are making contact with my client’s forearm during elbow flexion. How do I correct this?
a. Confirm that the Above Elbow Cuff is positioned correctly.
b. Slide the Outriggers in a distal direction.
c. When the elbow is flexed to 90°, be sure there is a 2” space between the end of the Pulleys and the forearm.
d. Reposition the Elbow Stop so the distal edge is just proximal to the olecranon when the elbow is extended.
Here’s a digital copy of the SaeboReach Instruction Manual
Here’s a digital copy of the SaeboFlex User Manual.
SaeboStep
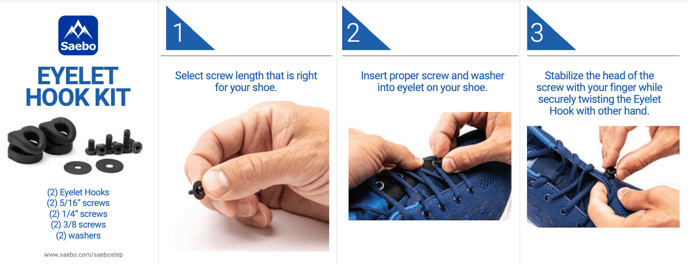
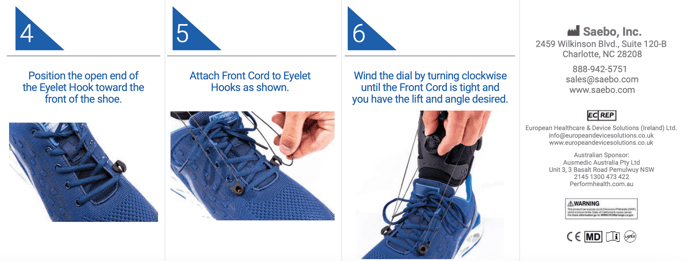
The SaeboStep Eyelet Hook Kit comes with three different screw lengths to secure the hook to your shoe. Be sure to select the appropriate screw length for your shoe. Each shoe is different and the material around the eyelet can be thicker on some shoe designs. It is important that the screw is long enough to thread into the brass fitting on the underside of the eyelet hook to secure it properly. If your eyelet hook has popped off, you may need to select the next longest screw. Next, make sure you tighten the screw using the Allen wrench provided in your kit.
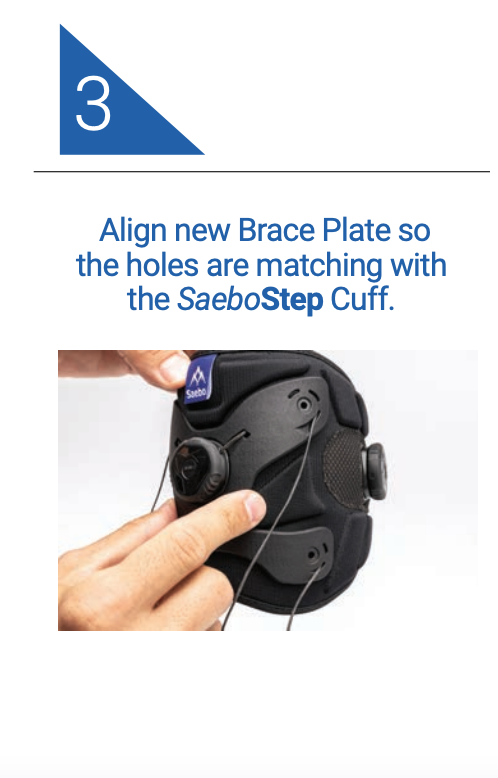
This manual will show you how to replace the lace on your SaeboStep (Gen 2).
You can also refer to this downloadable guide to Replacing the Lace on Your SaeboStep Brace.


This video will show you how to replace the Lace on your SaeboStep (Gen 1).
You can also refer to this downloadable guide to Replacing the Lace on Your SaeboStep Brace.
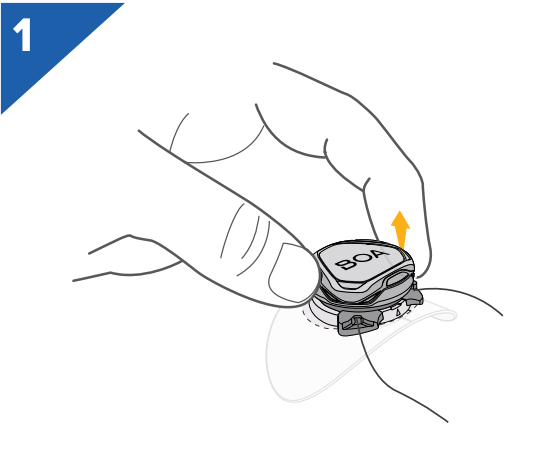
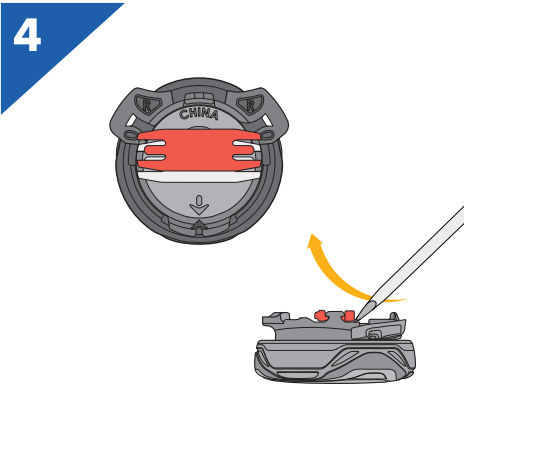
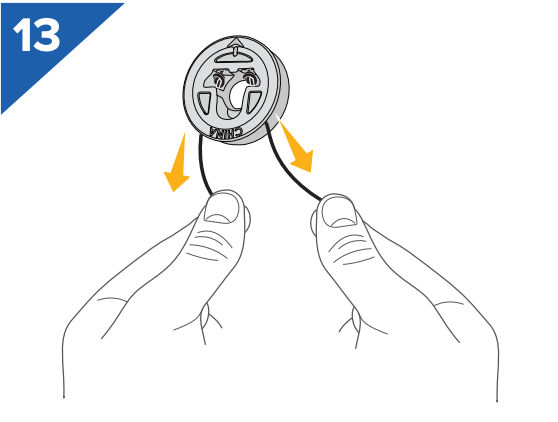
Step 1: Pull dial outward to engage the spool.
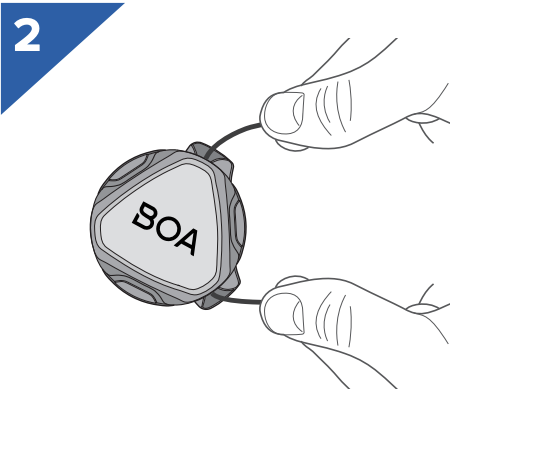
Step 2: Pull on the lace to unwind.
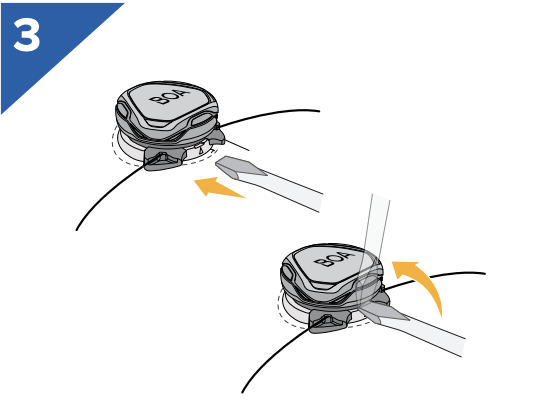
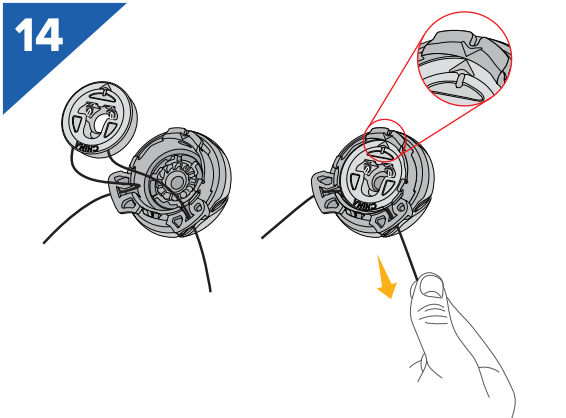
Step 3: Insert flat tool in between cartridge and base and pry upwards to release the cartridge from the brace. Cartridge will pop out.
Step 4: Use a flat tool (such as a screwdriver) to gently pry the red piece out.
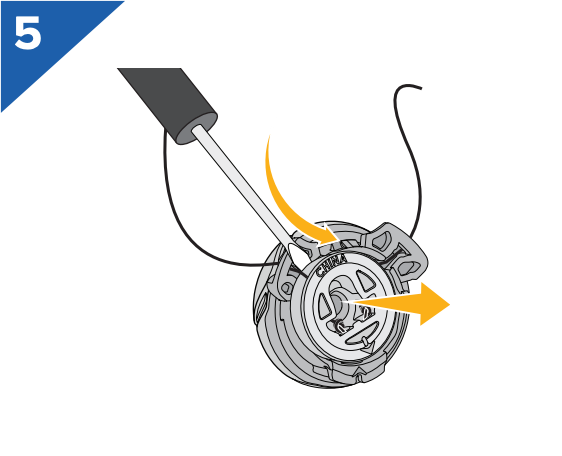
Step 5: Remove the spool from the cartridge.

Step 6: Tease the knots out of the center of the spool.
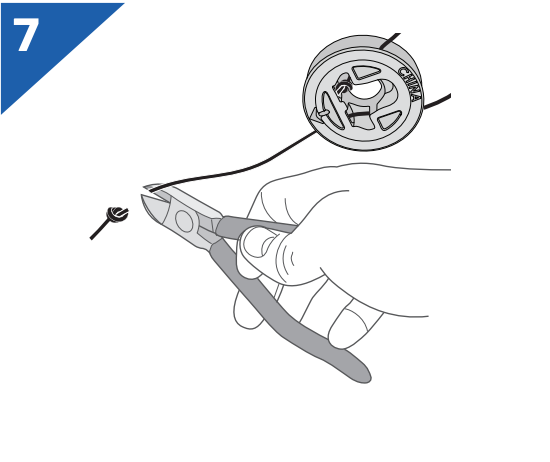
Step 7: Clip off the knots on both ends of the lace.
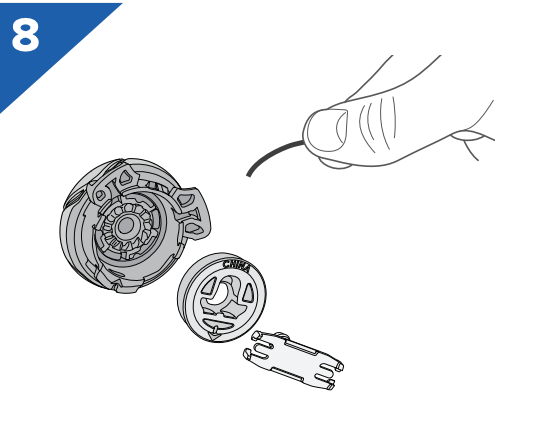
Step 8: Remove lace from spool, cartridge, and brace. Remove flexible tubing from old lace.
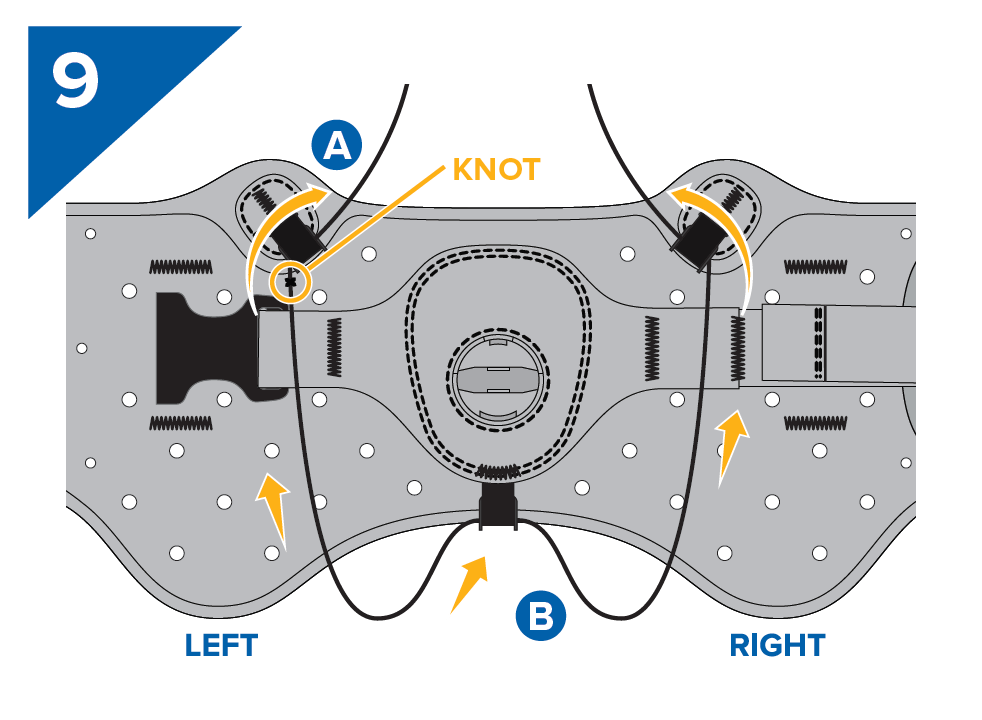
Step 9A: Thread knot end of the lace upward through an upper guide.
Step 9B: Thread the other end through the lower guide and then up through the opposite upper guide.
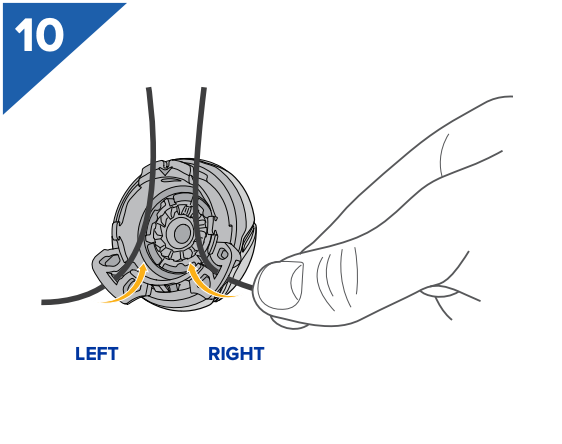
Step 10: Thread both ends of lace through the correct cartridge opening.
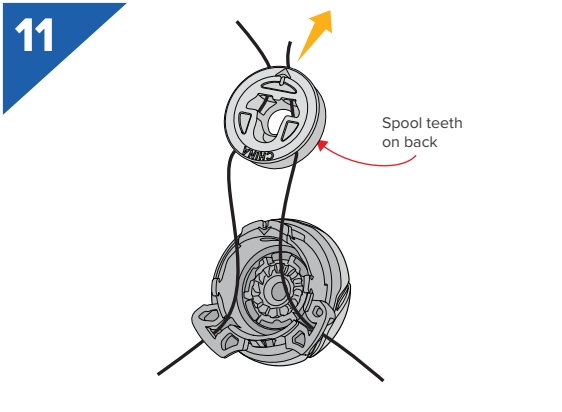
Step 11: With the spool teeth facing the cartridge, thread both ends of lace through correct openings in the spool and out through the side with the arrow.
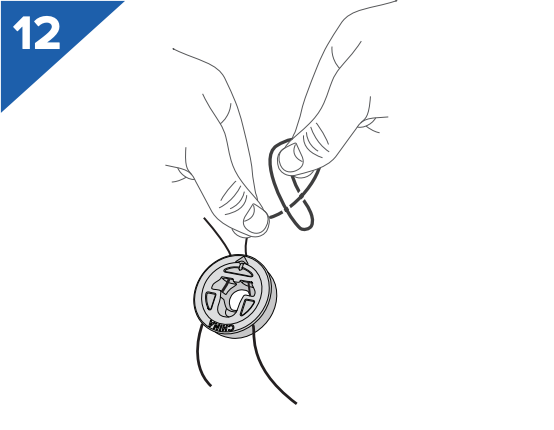
Step 12: Tie knots on each end of the lace as close to the end as possible. Trim off any excess length exceeding 1/8”.
Step 13: Pull the lace back through the spool so the knots are secured in the middle of the spool. The knots should not come out of the top of the spool.
Step 14: Click the cartridge and spool together so that arrow on the spool and the arrow on the tab of the cartridge are aligned as closely as possible.
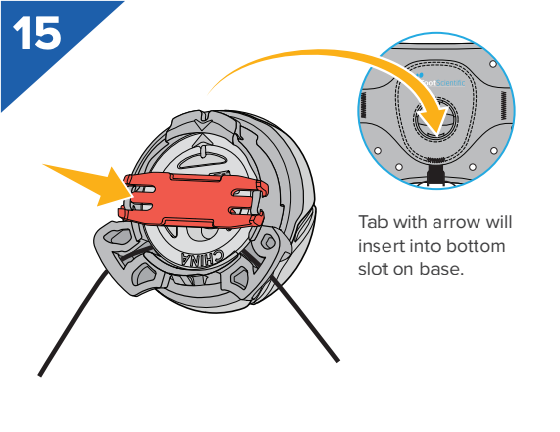
Step 15: Insert red piece into the middle of the spool horizontally as shown and push it until it clicks and holds the spool in place.
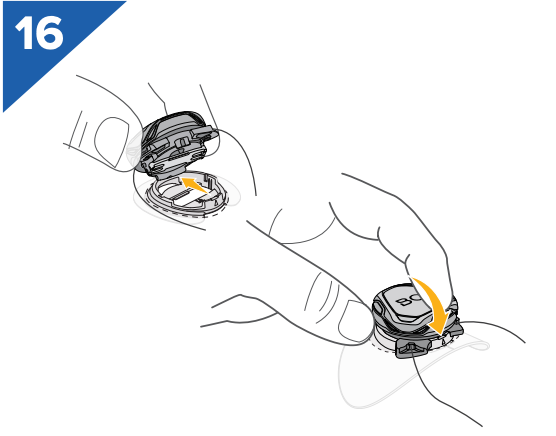
Step 16: Re-insert cartridge into the base by putting the bottom tab in first, then clicking the cartridge into place.
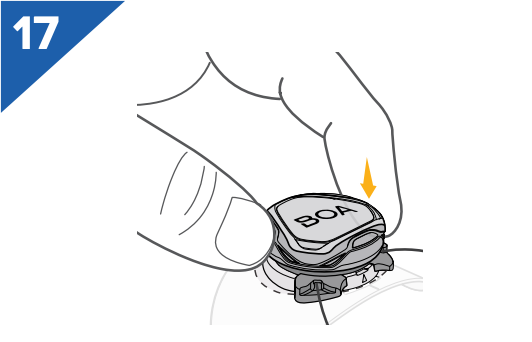
Step 17: Ensure that the dial is pushed in to engage the spool, then wind the laces by twisting the dial clockwise. LEAVE SLACK WHEN NOT IN USE – NEVER WIND LACE COMPLETELY INTO THE BOA.
How to change the side dial on your SaeboStep foot drop brace.
Please watch this video to guide you on how to replace the side dial on your SaeboStep.
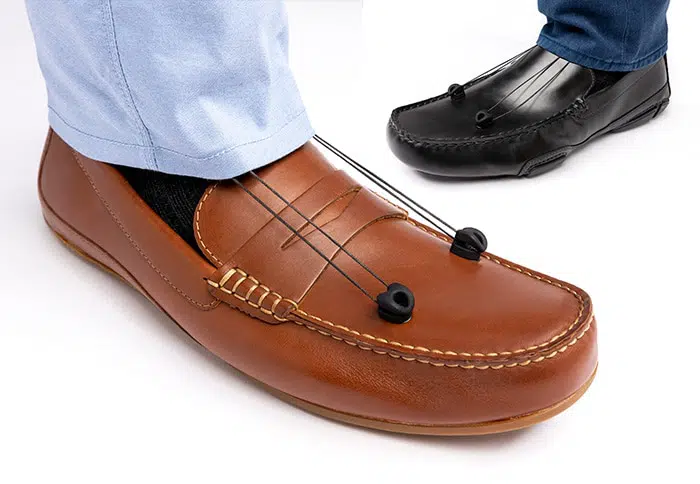
You can use your SaeboStep on shoes without laces. Read below.
The SaeboStep can even be worn comfortably with the majority of male or female shoe styles. Therefore, you are not limited to certain shoes. Individuals can use their favorite shoes by ordering the accessory kit to enable shoes without eyelets to be modified.
SaeboStep Crop-A-Dile
The SaeboStep Crop-A-Dile is an all-in-one tool for punching, setting, and snapping. It is ideal for eyelets and grommets and can punch through paper, leather, fabric, plastic, thin tin, chipboard, and much more! The Crop-A-Dile allows for numerous possibilities, including various correction angles with the SaeboStep. The Crop-a-Dile has a 6-inch reach to customize any type of shoe for use with the SaeboStep drop foot brace.
SaeboStep Eyelet Hook Kit
The SaeboStep Eyelet Hook Kit is the preferred method of adjusting the SaeboStep drop foot brace for everyday wear. Install the Eyelet Hooks onto the shoe only once, then simply attach the Cord to SaeboStep. Available in Black.
This manual will show you how to install eyelet hooks on your SaeboStep (Gen 2).
Refer to this downloadable guide to installing Eyelet Hooks on your SaeboStep Brace (Gen 2).
This video will show you what you will receive in your SaeboStep (Gen 1) product box.
This video will show you how to replace the Spectra Cord on your SaeboStep (Gen 1).
This video will show you how to properly apply the anchor kits for your SaeboStep.
The SaeboStep can be adjusted to accommodate some pediatric patients.
The SaeboStep brace has been successful for those as young as 4-5 years old. With respect to sizing, extra brace length can be trimmed off for a less bulky look on a child, but for the smallest sizing (6 inches / 15cm – 3-5 years old for an average child) it is useful to keep the extra strap material on so that the additional strap snaps more snuggly without being modified.
For an ankle circumference of 7 inches / 18 cm or more (about 5-6 years and up for an average size ankle), the patient can choose to trim the excess or leave it on.
If needed, using a neoprene or foam ankle piece helps with the circumference issue.
This video will show you how to use the SaeboStep Crop-A-Dile to create eyelets in your own personal shoes.
Refer to this guide when using the SaeboStep Foot Drop Brace


Saebo Mirror Box
This video will show you what you will receive in your Saebo Mirror Box product box.
Here’s a digital copy of the Saebo Mirror Box User Manual

Saebo MyoTrac Infiniti
The video will help you put together your Saebo MyoTrac Infiniti device and how to start it.
SaeboReJoyce
The “print” function of the hand function test results will create a PDF file.
To physically print the PDF file, there are a few options:
1. Burn it to a CD that can be transferred to another computer with printing capabilities. This is the safest method.
2. Use a USB flash drive to transfer the PDF to another computer with printing capabilities.*
DISCLAIMER: Do so at your own risk. Saebo, Inc is not responsible for any malware that may be transferred to or from the flash drive, and any resulting difficulties.
3. Wirelessly connect to a wireless printer
DISCLAIMER: If additional printer drivers are installed, Saebo, Inc. is not responsible for any effects on the system performance. The probability is unlikely, however.
4. Connect to a printer via USB*
DISCLAIMER: If additional printer drivers are installed, Saebo, Inc. is not responsible for any effects on the system performance. The probability is unlikely, however.
*CAUTION: Do not connect USB devices while the ReJoyce is in use. Because the ReJoyce has been tested for EMC and safety compliance assuming no USB peripherals are attached, any USB connections (e.g. printer) should only be connected when the system is not in use and should be disconnected prior to resuming use.
How do you fix the graphics on the SaeboReJoyce laptop if the picture has stripes and/or blocks?
If you are experiencing stripes or blocks on the screen during the tennis application, the graphics issue is likely due to the Adobe Air script that the computer is currently running on.
- First, exit the SaeboReJoyce software.
- Make sure the laptop is connected to the Internet.
- Visit https://get.adobe.com/air/ to download the current version of Adobe Air (version 25 or newer), and install the downloaded file (overwriting the previous version of Adobe Air).
- After installation, restart the SaeboReJoyce software and restart the tennis app.
That should solve your graphics issue. If you are still experiencing issues with the graphics on your SaeboReJoyce, please call 888-284-5433 or open a Support Ticket.
SaeboMAS
This video will walk you through how to install and adjust the SaeboMAS Pronation/Supination Attachment.
Please follow the below maintenance program to maximize the longevity of the product while minimizing wear and tear.
Forearm Support Hardware
It is recommended that the Forearm Support Hardware is periodically examined for any loose components. To test, please do the following:
Step 1: Stabilize the forearm support with one hand.

Step 2: Confirm that the top hardware is secured tight. If loose, please secure with a wrench so it is snug. Do not overtighten.

Step 3: Confirm that the side hardware is secured tight. If loose, please secure with a wrench so it is snug. Do not overtighten.

Tension Scale Hardware
Depending on how often the SaeboMAS is used, the Tension Scale vertical screw (attached to the Tension Indication Knob) may need more lubricant. If you hear a slight “squeak” while adjusting the tension, or it is becoming increasingly difficult to adjust the tension, please apply WD-40 (or something similar) along the length of the vertical screw. Once it is applied, adjust the tension from 1 to 15 to make sure the screw is coated evenly.

Extra Tips:
• It is important to confirm that all hardware (bolts, screws) are secured (not loose) to maximize use and limit wear and tear.
• Examine the Table Mount to make sure all hardware is secure and working in proper order.
If you have any questions regarding the maintenance of your SaeboMAS, please do not hesitate to Open a Support Ticket. We would be happy to assist you.
SaeboVR
This guide will provide solutions to troubleshoot common SaeboVR issues.
Compensatory Motion and Torso Movement
· SaeboVR only recognizes shoulder and elbow movements. Compensatory leaning is ignored
· Instruct patients to use their arm only, and to avoid forward, backward, or side-to-side leaning
Over-reaching
· It is common for new users to over-reach past or through targeted objects
· Ask the patient to bring the arm back so the avatar hand is on the targeted object
· To help users know they are overreaching, the avatar hand turns blue when it has “gone inside” a virtual object. This is a cue to bring the hand back so it can be seen normally
Resetting Kinect Sensor Tracking
· If the avatar does not appear to be following the patient’s arm, Kinect tracking may need to be reset
· Click the “K” key on the keyboard to reset Kinect tracking
· You should then see the avatar following the patient’s arms
Wrong Person Tracked
· If resetting the Kinect using “K” key does not work, the Kinect may be tracking the wrong person (a different person in the sensor field of view)
· Click the “P” key on the keyboard to change the person being tracked. If there are multiple persons in the sensor field of view, you may need to repeat multiple times to find the correct person
· You should then see the avatar following the patients’ arms
Bad Sensor Angle
· Poor tracking may result if the sensor is not facing the patient. Ensure the sensor is properly facing the seated user
· Adjusting the sensor alignment should improve tracking
Remove Bulky Overgarments
· A bulky jacket or sweater can make it difficult for the sensor to track a user. If tracking is poor, remove bulky overgarments
Smudged Sensor Lens
· If the sensor lens becomes dirty or smudged, poor tracking can result. Clean the lens carefully with a microfiber cloth or an isopropyl alcohol wipe
Force Exit From Activity
· If for any reason you need to exit an activity and return to the player dashboard, use the Shift+Esc key sequence
· Press the Shift and Esc keys simultaneously
Force Exit from SaeboVR Application
· If the SaeboVR program becomes unresponsive, you may need to force the program to exit and then restart. Use the Alt+Fn+F4 key sequence
· Restart the SaeboVR patient application normally
Pause an Activity
· You may pause an activity at any time by using the ESC key on the keyboard
· Clicking the ESC key again unpauses the activity
Mouse Click to Complete a Task
· All tasks in the SaeboVR activities can be completed using a mouse click on the target object (employing the touchpad on the keyboard)
· If a patient is unable to complete a movement, the therapist can use the mouse to progress to the next task. Just move the cursor to the targeted object and click
Self-Assist
· If a patient has difficulty completing a reaching movement, the non-affected arm may be used to self-assist
Hand-Over-Hand Assist
· If self-assist is not possible, the therapist may perform a hand-over-hand assist. Note that, in some cases, this may degrade the quality of tracking
Press “C” for Auto-Complete
· Anytime during an activity, the therapist has the option to press the “C” key to complete the action (e.g. pick up or place an object) for the patient in the event he or she can’t quite complete the movement due to strength, range of motion, or tracking issues.